How to Import Your First Product from Spocket to Shopify
Learn how to connect Spocket with Shopify and import your first dropshipping product step by step, from product selection to pushing it live on your store.
.avif)

Importing your first product from Spocket to Shopify is one of the first practical steps in building a dropshipping store. Once both platforms are connected, you can browse products on Spocket, add them to your import list, edit the details, and push them directly to your Shopify store.
This saves time because you do not have to manually copy product titles, descriptions, images, variants, and pricing. However, importing a product is not just about clicking one button. You still need to review the listing, adjust the title, improve the description, check images, set your price, and make sure the product page looks ready for customers.
In this step-by-step guide, you will learn how to connect Spocket with Shopify and import your first product the right way. You will also find screenshot placement suggestions throughout the article so you can turn this into a helpful visual tutorial.
Why Import Products from Spocket to Shopify?
Importing products from Spocket to Shopify helps you set up your dropshipping store faster and with less manual work. Shopify gives you the storefront, checkout, product pages, payment setup, and store management tools. Spocket helps you discover dropshipping products from suppliers and move them into Shopify more easily.
This connection is useful because product setup can take time when done manually. You need images, product details, variants, prices, descriptions, and shipping information. With Spocket, you can add a product to your import list, customize it, and send it to Shopify when it is ready.
It also gives you more control over how your store looks. Instead of publishing a product exactly as it appears from the supplier, you can edit the listing so it matches your niche, brand voice, and pricing strategy.
What You Need Before You Start
Before importing your first product, make sure your basic setup is ready. This will make the process smoother and help you avoid interruptions while connecting the platforms.
You do not need a fully finished Shopify store before importing a product, but you should have your main accounts and store access prepared.
You will need:
- A Shopify account
- A Spocket account
- Access to your Shopify admin dashboard
- A connected Shopify store
- A product niche or category in mind
- Basic pricing and branding direction
- Store currency and shipping settings reviewed
It is also helpful to have your Shopify theme installed, even if it is not fully customized yet. This allows you to preview how your imported product will look on your actual store.
How to Import a Product from Spocket to Shopify- Step by Step
Once your Shopify store and Spocket account are ready, the next step is to import your first product carefully instead of rushing it live. The process starts with logging in to Shopify, opening the Spocket app, connecting both platforms, choosing the right product, and reviewing every detail before publishing. Each step helps you create a cleaner product listing, avoid beginner mistakes, and make sure your store looks trustworthy when customers visit it.
Step 1: Log in to Your Shopify Store
Start by logging in to your Shopify admin dashboard. This is where you manage your products, orders, apps, customers, store settings, and theme.
Once you are inside Shopify, check that you are in the correct store. This is important if you manage more than one Shopify store or are testing different stores. To log in:
- Open your Shopify login page
- Enter your email and password
- Go to your Shopify admin dashboard
- Confirm the store name
- Check that your basic settings are correct
You do not need to finalize your whole store before importing a product. However, your store should be active enough to install apps and connect with Spocket.
Step 2: Install or Open the Spocket App
Next, open the Spocket app inside Shopify. If you have already installed it, you can find it in your Shopify Apps section. If you have not installed it yet, add it from the Shopify App Store. When installing Spocket, Shopify may ask you to approve permissions. These permissions allow Spocket to connect with your store and send product information to Shopify.

To open Spocket:
- Go to your Shopify dashboard
- Click Apps from the menu
- Search for Spocket
- Open the app
- Follow the setup prompts
Once the app opens, you can either create a Spocket account or log in to your existing account.
Step 3: Connect Spocket with Shopify
After opening Spocket, connect it with your Shopify store. This connection allows you to import products directly from Spocket into Shopify.
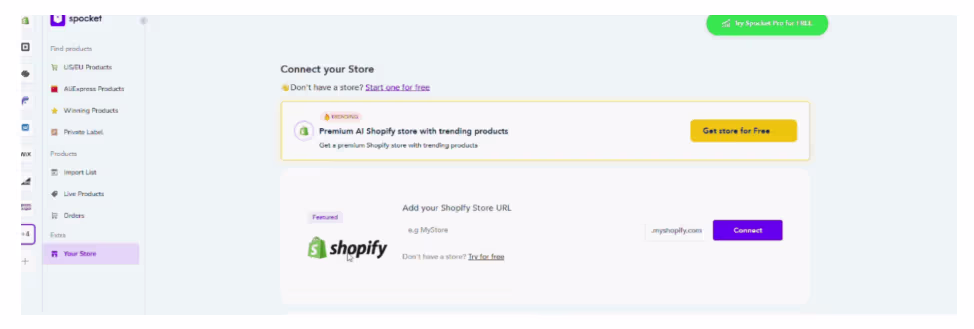
The process may look slightly different depending on whether you start from Shopify or from your Spocket dashboard. In most cases, you will need to confirm your Shopify store URL and approve the connection.
Follow these steps:
- Open your Spocket dashboard
- Select Shopify as your ecommerce platform
- Enter or confirm your Shopify store URL
- Approve the connection request
- Wait for the confirmation message
Once the connection is complete, your Shopify store and Spocket account will be linked. You can now browse products, add them to your import list, and push them to Shopify.
Step 4: Browse Products on Spocket
Now you can start searching for your first product. This step matters because your first product can influence your store’s branding, pricing, marketing, and customer experience.
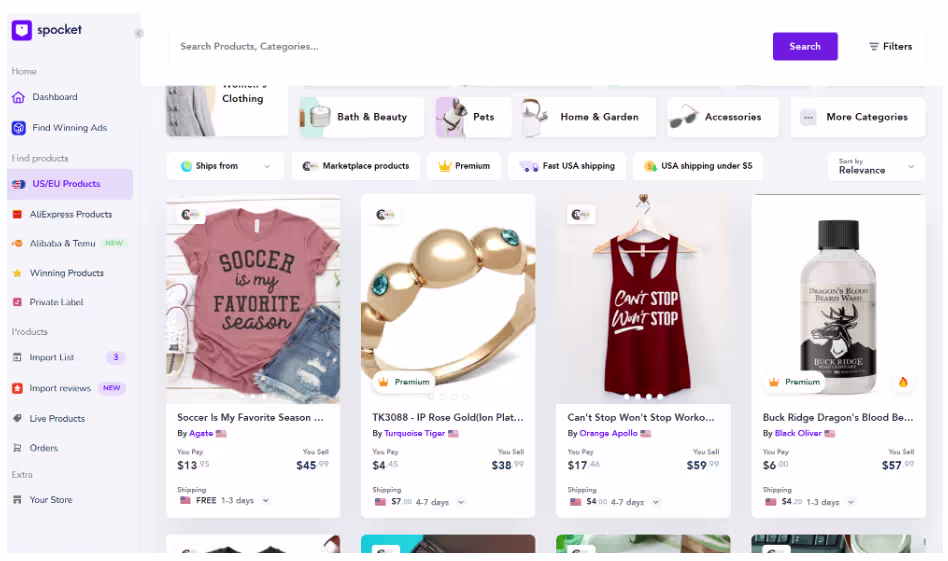
Inside Spocket, browse products by category, keyword, supplier location, shipping options, or niche. If you already know your store category, search for products that match that direction.
For example, if you are building a pet store, you can search for pet accessories, grooming tools, pet beds, or walking essentials. If you are creating a home store, you can look for organizers, decor, lighting, or kitchen products.
When browsing products, look for:
- Clear product images
- A product that fits your niche
- Reasonable shipping time
- Good product details
- Simple variants
- Pricing that leaves room for profit
- Strong customer appeal
Avoid choosing a product only because it looks popular. Your first product should fit your audience, your store theme, and your long-term niche.
Step 5: Review Product Details
Before adding a product to your import list, open the product page and review the details carefully. This helps you avoid importing products that may not match your store or pricing strategy.
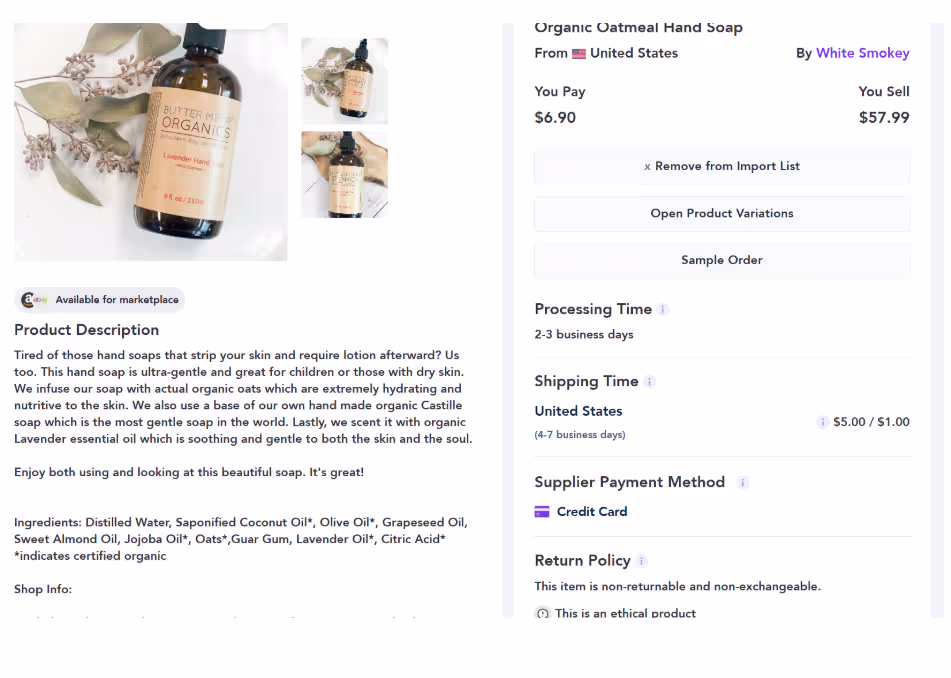
Check the product title, images, variants, supplier details, shipping information, and product cost. If the product has multiple variants, make sure they are clear and easy for shoppers to understand.
Review these details:
- Product cost
- Suggested retail price
- Shipping time
- Product images
- Available variants
- Supplier information
- Product description
- Product category
You should also think about profitability. Your selling price should cover product cost, shipping cost, payment fees, marketing costs, and profit margin. If the product cost is too high or the margin is too low, it may not be the right first product.
Step 6: Add the Product to Your Import List
Once you find a product you want to sell, add it to your import list. The import list acts like a draft area where you can edit the product before sending it to Shopify.
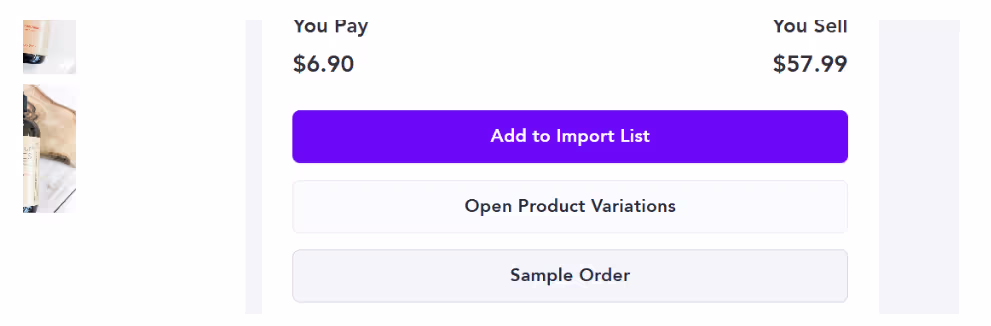
This is useful because you should not always publish a product exactly as it appears from the supplier. You may want to rewrite the title, improve the description, change the price, remove some images, or adjust variants.
To add a product:
- Open the product in Spocket
- Click Add to Import List
- Go to the Import List section
- Find the product you selected
- Review the product before pushing it to Shopify
Adding a product to your import list does not publish it on Shopify yet. It simply prepares the product for editing.
Step 7: Edit the Product Title and Description
Before pushing the product to Shopify, edit the title and description. This is one of the most important steps because default supplier titles and descriptions often sound generic.
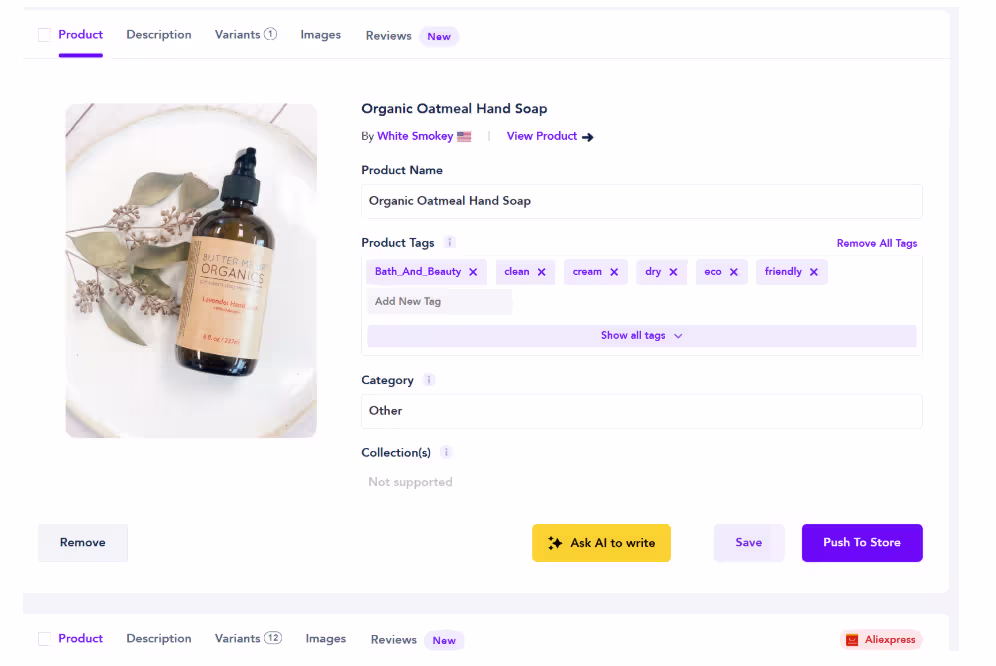
Your product title should be clear, short, and search-friendly. Avoid long titles filled with unnecessary words. A clean title helps customers understand the product quickly.
For example, instead of: “High Quality Multi-Function Portable Pet Grooming Hair Removal Brush for Dogs and Cats”
Use: “Pet Grooming Brush for Dogs and Cats”
Your product description should explain the benefit of the product in simple language. Do not only list features. Tell customers how the product helps them.
A strong description should include:
- What the product does
- Who it is for
- Why it is useful
- How customers can use it
- Key features or benefits
For example: “Keep your pet’s coat cleaner with a simple grooming brush designed for everyday use. It helps remove loose hair, supports a smoother grooming routine, and works well for both dogs and cats.”
This sounds more natural and gives shoppers a clear reason to buy.
Step 8: Check Images, Variants, and Pricing
After editing the text, review the images, variants, and pricing. These details can affect whether your product page looks professional and whether the product is profitable.
Choose images that clearly show the product. Remove blurry, repetitive, or confusing images. If lifestyle images are available, include them because they help customers imagine using the product.
Then check the variants. If the product has different sizes, colors, or styles, make sure each option is clear. Remove variants that do not fit your store or may confuse customers. Finally, set your pricing. Do not simply copy the suggested price without checking your margins. Your price should cover all costs and still leave room for profit.
Before setting your price, consider:
- Product cost
- Shipping cost
- Competitor pricing
- Payment fees
- Marketing costs
- Desired profit margin
- Perceived product value
If your product is too cheap, you may not make enough profit. If it is too expensive, customers may compare prices and leave. Aim for a price that feels fair, profitable, and aligned with your brand.
Step 9: Push the Product to Shopify
Once the product title, description, images, variants, and pricing are ready, you can push the product to Shopify.
This sends the product from your Spocket import list to your Shopify Products section. Depending on your settings, the product may appear as active or draft. To push the product:
- Go to your Spocket Import List
- Find the product you edited
- Review the details one last time
- Click Push to Store
- Wait for the confirmation message
After this, open your Shopify admin and go to Products. You should see the imported product listed there. Do not start promoting the product immediately. First, review it inside Shopify to make sure everything looks right.
Step 10: Review the Product in Shopify
After pushing the product, go back to Shopify and open the Products section. Find the product you imported and check how it appears inside your Shopify admin.
This final review helps you catch anything that may need adjustment. You may want to edit the formatting, add the product to a collection, update tags, or check the search engine listing preview.
Review these details:
- Product title
- Product description
- Images
- Price
- Variants
- Product status
- Tags
- Collections
- Search engine listing
- Sales channel availability
If the product is not visible on your storefront, check whether it is active and available on the correct sales channel. Also make sure it is added to the right collection if your store uses collection-based navigation.
Step 11: Add the Product to a Collection
Collections help organize your Shopify store and make it easier for customers to browse. Even if you are starting with one product, setting up collections early is a good habit.
For example, if your product is a pet grooming brush, you can add it to a collection called “Pet Grooming” or “Dog Accessories.” If your product is a kitchen organizer, add it to “Kitchen Storage” or “Home Organization.”
Collections can be based on:
- Category
- Product type
- Niche
- Season
- Bestsellers
- New arrivals
- Gift ideas
Adding your product to the right collection improves navigation and helps customers discover related products as your store grows.
Step 12: Optimize the Product for SEO
Before publishing or promoting the product, optimize it for search. Shopify lets you edit the search engine listing preview, including the page title, meta description, and URL handle.
Your SEO title should include the product keyword naturally. Your meta description should explain the benefit and encourage clicks.
Example:
SEO Title: Pet Grooming Brush for Dogs and Cats
Meta Description: Keep your pet’s coat cleaner with an easy-to-use grooming brush designed to remove loose hair and support everyday pet care.
URL Handle: pet-grooming-brush-dogs-cats
Also use relevant keywords naturally in the product title, description, image alt text, and product tags. Avoid keyword stuffing. Your product page should still sound human and easy to read.
Step 13: Preview and Publish the Product
Before making your product live, preview the page from a customer’s perspective. This helps you catch layout issues, missing details, or confusing sections.
Open the product page on desktop and mobile. Since many shoppers browse on mobile, mobile preview is especially important.
Check that:
- The product title is clear
- Images display properly
- Description is easy to read
- Price is correct
- Variants work properly
- Add-to-cart button is visible
- Shipping details are clear
- The page looks good on mobile
Once everything looks ready, publish the product. You can then start preparing your marketing plan, social media posts, email campaigns, or paid ads.
Common Mistakes to Avoid
Importing your first product is simple, but beginners often skip important cleanup steps. This can make the store look unfinished or reduce customer trust. Avoid these mistakes:
- Using the default supplier title
- Leaving a generic product description
- Importing too many weak images
- Not checking product variants
- Setting prices without calculating margins
- Forgetting to add the product to a collection
- Not editing the SEO title and meta description
- Publishing without previewing the page
- Ignoring shipping expectations
- Choosing a product that does not fit your niche
Your first product sets the tone for your store. Take a little extra time to make the listing clear, useful, and trustworthy.
Final Checklist Before Publishing
Before your imported product goes live, use this checklist to make sure the listing is ready. Check that:
- The product title is clean and clear
- The description is rewritten for customers
- Images look professional
- Pricing leaves room for profit
- Variants are accurate
- Shipping information is clear
- Product is added to the right collection
- SEO title and meta description are updated
- Product page looks good on mobile
- Add-to-cart button works properly
A polished product page improves customer trust and gives your store a better chance of converting visitors into buyers.
Final Thoughts
Importing your first product from Spocket to Shopify is a simple process, but it should be done carefully. The goal is not just to move a product into your store. The goal is to create a product page that looks professional, explains the value clearly, and gives customers confidence to buy.
Start by connecting Spocket with Shopify, browsing products, reviewing product details, and adding your chosen product to the import list. Then edit the title, description, images, variants, and pricing before pushing it to Shopify.
Once the product appears in Shopify, review it again, add it to a collection, optimize it for SEO, and preview the final page. With Spocket, you can source products from reliable suppliers and import them into Shopify more efficiently, helping you build a stronger foundation for your dropshipping store.
Start your dropshipping business today
FAQs about Importing Your First Product from Spocket to Shopify
How do I connect Spocket to Shopify?
You can connect Spocket to Shopify by installing the Spocket app from Shopify, opening it, and approving the required permissions. Once connected, you can browse and import products.
Can I import products from Spocket to Shopify automatically?
Yes, Spocket lets you add products to your import list and push them to Shopify. You should still review and edit product details before publishing.
Should I edit products before pushing them to Shopify?
Yes. Edit the product title, description, images, pricing, and variants before pushing the product to Shopify. This makes the listing more professional and customer-friendly.
Where do imported Spocket products appear in Shopify?
After you push a product from Spocket, it appears in the Products section of your Shopify admin. From there, you can edit, organize, and publish it.
Why is my imported product not showing on my Shopify store?
The product may be saved as a draft, unavailable on your sales channel, or not added to the right collection. Check the product status, sales channel settings, and collection assignment.


Launch your dropshipping business now!
Start free trial


Related blogs

Best Shopify Apps for New Stores Ranked by ROI
Start your Shopify store with high-impact apps that help you source products, win customer trust, recover sales, boost order value, and grow faster.

Complete Shopify Dropshipping Checklist: Free Template for Launching Your Store
Use this Shopify dropshipping checklist to launch your store with the right products, suppliers, pages, apps, SEO, payments, and marketing plan.
Free vs Paid Shopify Themes for Dropshipping
Compare free vs paid Shopify themes for dropshipping, key pros, costs, features, speed, and when to upgrade for better conversions.