How to Create a Free Dropshipping Website With WordPress?
Here is a step-by-step guide on how to create a free dropshipping website with WordPress. Choose between WordPress.com and self-hosted options with no upfront cost.

A free online store sounds too good to be true. You want to start a dropshipping business but every platform you check asks for a monthly subscription before you can even list a single product. Those costs add up before you have made your first sale.
You do not need to pay for a store upfront. WordPress gives you two clear paths to build a functional dropshipping website without spending anything. Both paths have tradeoffs. One gives you a simple setup with a small ad displayed on your site. The other gives you full control with no ads, though it requires a few more technical steps.
This post walks you through both options. You will learn exactly how to sign up, choose a domain, install WordPress, and customize your store. By the end, you will have a live dropshipping website that anyone can visit. If you want to learn how to create a free dropshipping website with WordPress, then this guide is perfect for you.
Understanding Your Free WordPress Options
WordPress comes in two versions. They share the same name but work very differently. You need to know which one fits your dropshipping goals before you start clicking buttons.
WordPress.com is a hosted platform. The company handles all the technical maintenance, security updates, and server management for you. You sign up, pick a design, add products, and go live. The free plan includes a wordpress.com subdomain, 1 GB of storage, and dozens of free themes. You will see a small WordPress.com ad at the top of every page, and you cannot install plugins unless you upgrade to a paid plan. For a basic dropshipping store just starting out, this may be enough.
WordPress.org is the free, open-source software that powers over 43% of all websites. You download it and install it on your own web host. This gives you complete control. You can add any theme, install any plugin, and customize every detail. The tradeoff is that you must find and manage your own hosting. Free hosting providers make this possible at no cost, which is exactly what the second method below covers.
The key difference for dropshipping: On WordPress.com's free plan, you cannot install WooCommerce or other dropshipping plugins. You are limited to basic product listings without automated fulfillment. On a self-hosted WordPress.org setup, you can install WooCommerce and connect to suppliers directly. Which path you take depends on how much manual work you want to handle versus how much automation you need.
How to Create a Free Dropshipping Website with WordPress: 2 Ways
There are 2 ways on how to create a free dropshipping website with WordPress. We’ll cover them both for your convenience.
Way 1: Creating a Free Dropshipping Store on WordPress.com
This is the fastest way to get a store online. You will have a working website in under 30 minutes. The tradeoff is less flexibility and the inability to install dropshipping automation tools unless you upgrade later.
1. Sign Up for a Free WordPress.com Account

Go to WordPress.com. At the top of the page, click "Plans and Pricing." You will not see a free plan listed prominently. Read the fine print at the top of the pricing page and click the option that says "Start with a free plan."
Create your account using an email address or a Google/Apple account. Once your account is ready, you will be asked to choose a domain name.
2. Choose Your Free Subdomain
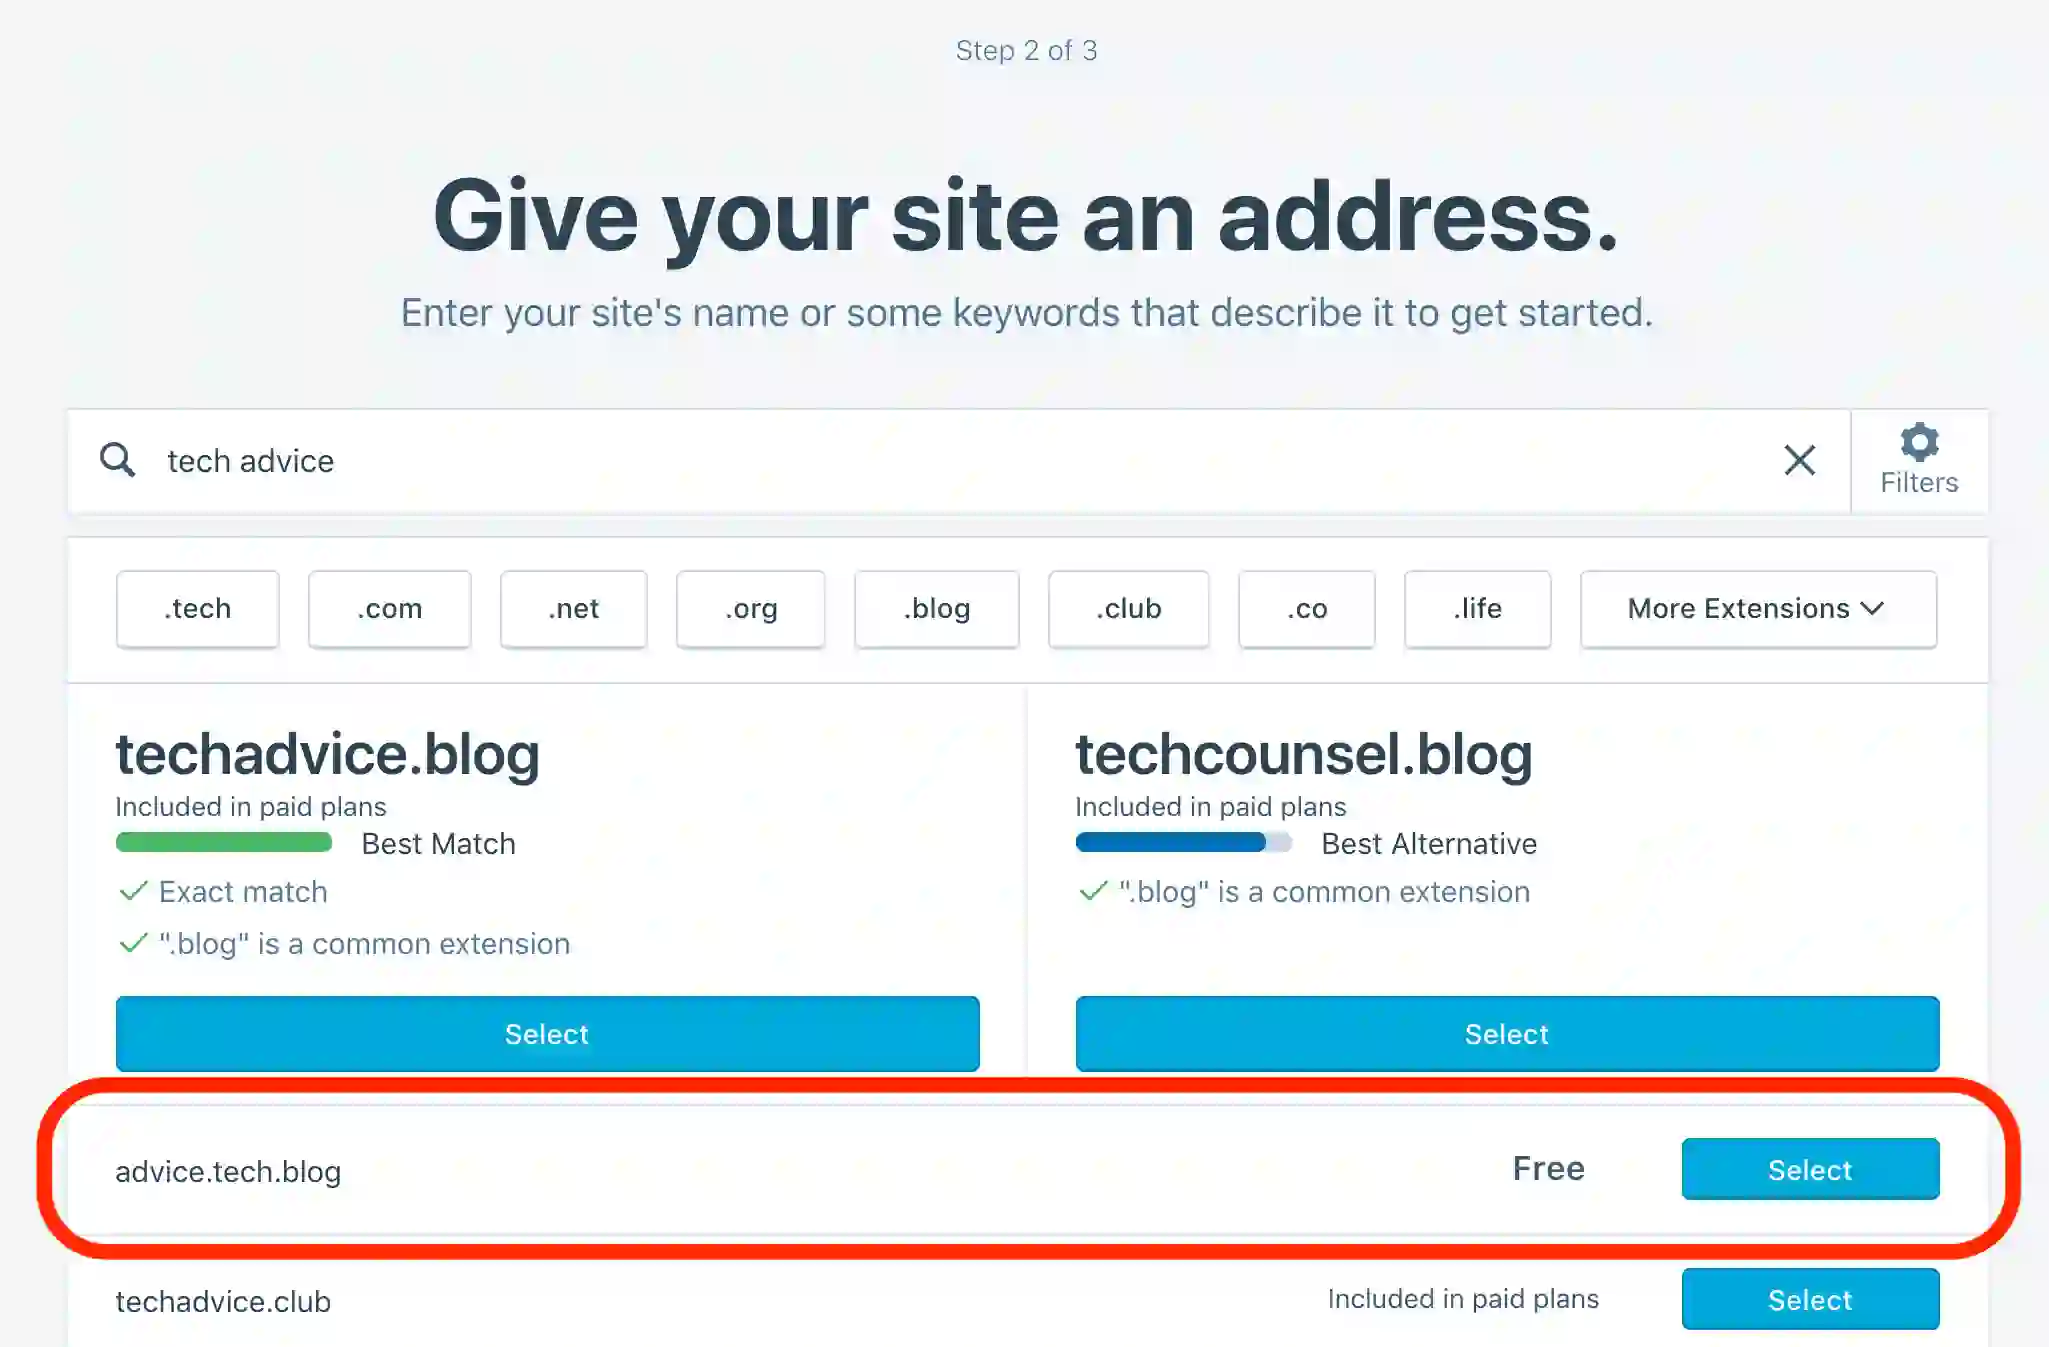
Type the name you want for your store. WordPress.com will show you paid domain options like .com or .blog. Scroll past those. Select the free option that ends with .wordpress.com. Your store URL will look like yourstorename.wordpress.com.
You can upgrade to a custom domain later from your dashboard. Starting with the free subdomain lets you test your idea without spending money.
3. Skip the Setup Questions and Go to Your Dashboard
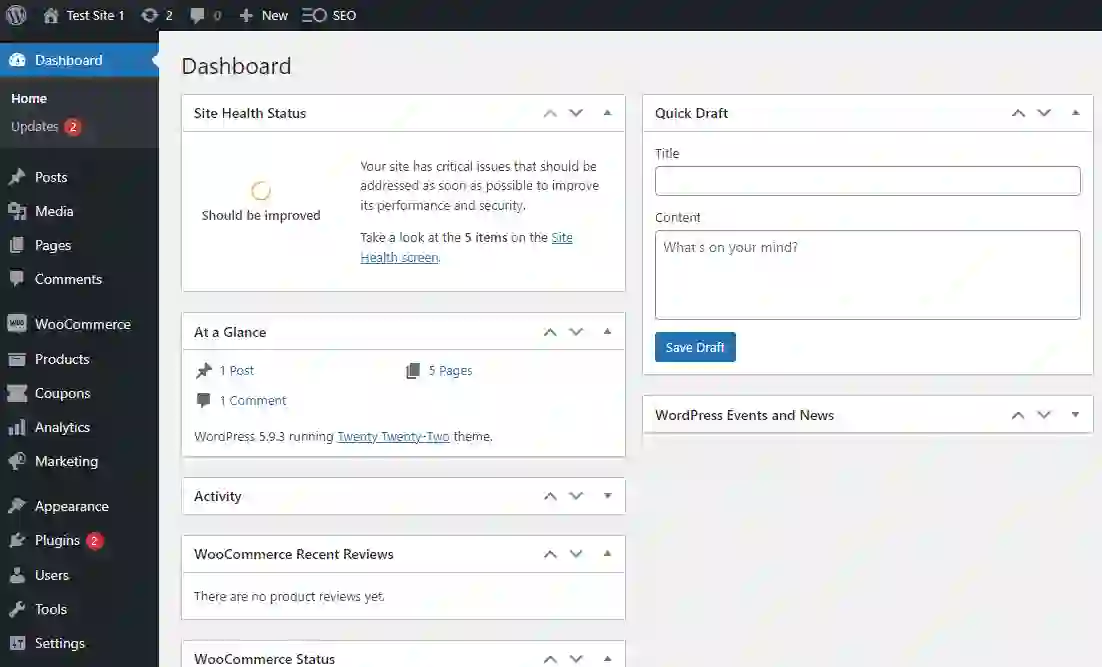
WordPress.com presents a series of onboarding questions designed to tailor your experience. You can answer them or skip them entirely. Scroll to the bottom and click "Skip to dashboard." This takes you directly to the main WordPress interface where you control everything.
4. Name Your Site and Set Your Site Icon
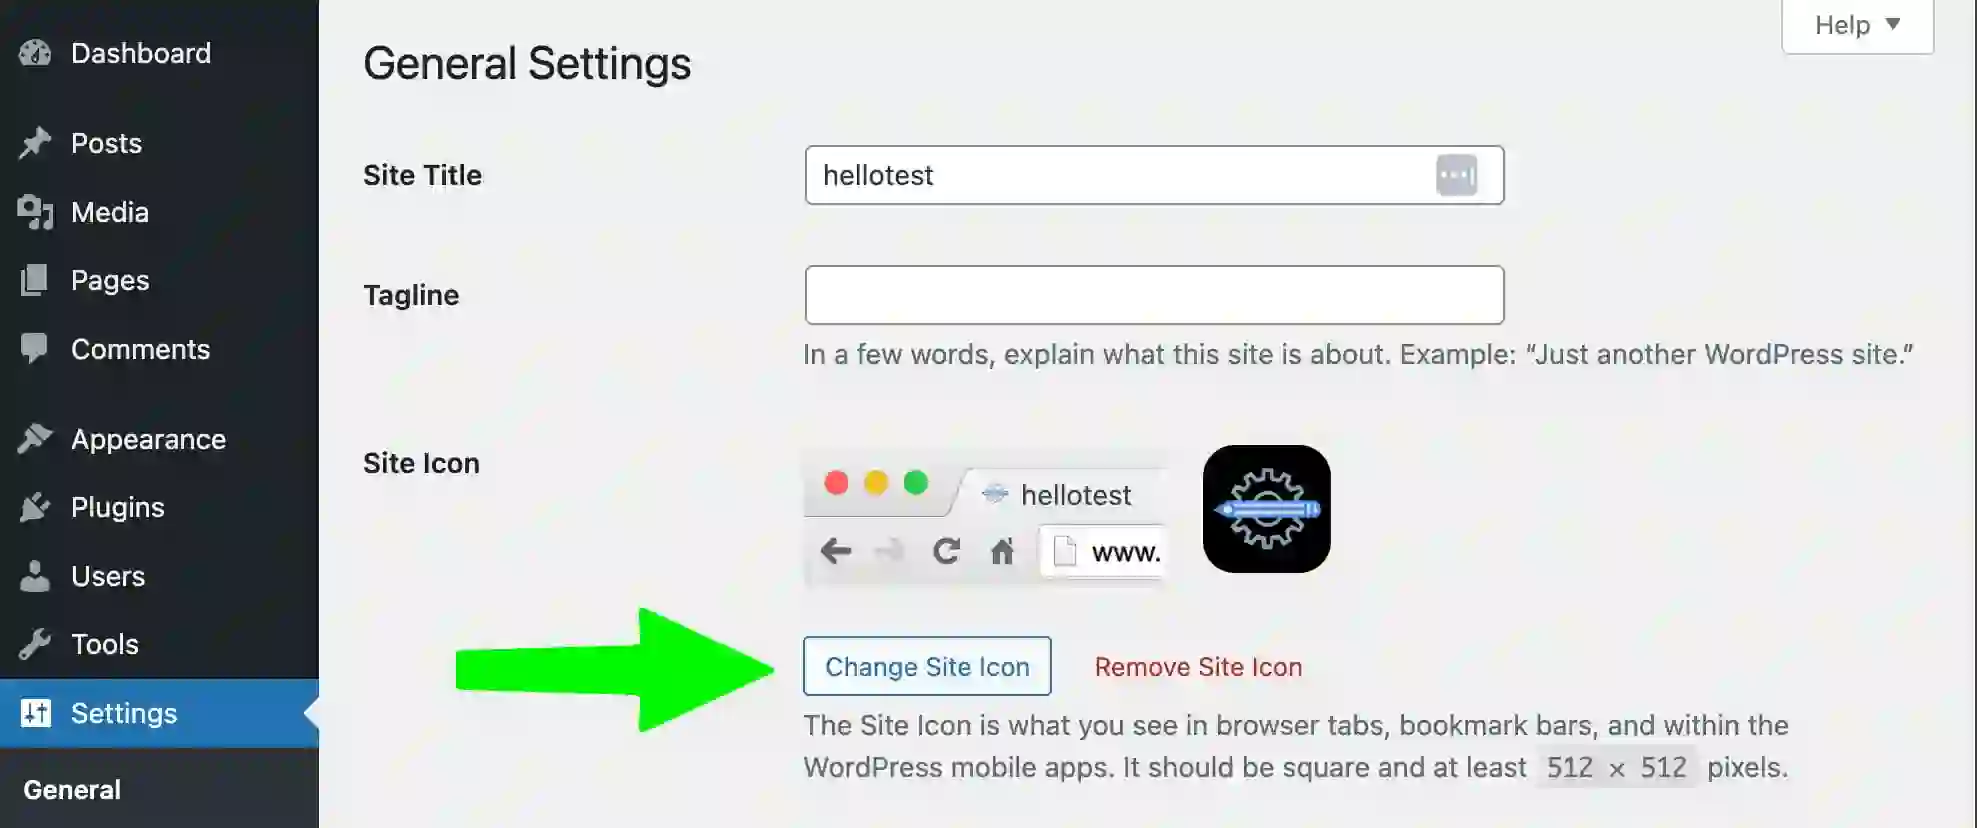
In your dashboard, locate the setup checklist in the center of the screen. Click "Give your site a name." This opens Site Settings. Replace the default "Site Title" with your store name.
You can also upload a site icon. This is the small image that appears in browser tabs next to your site title. Click "Save Changes" when you are done.
5. Add Your First Post or Page
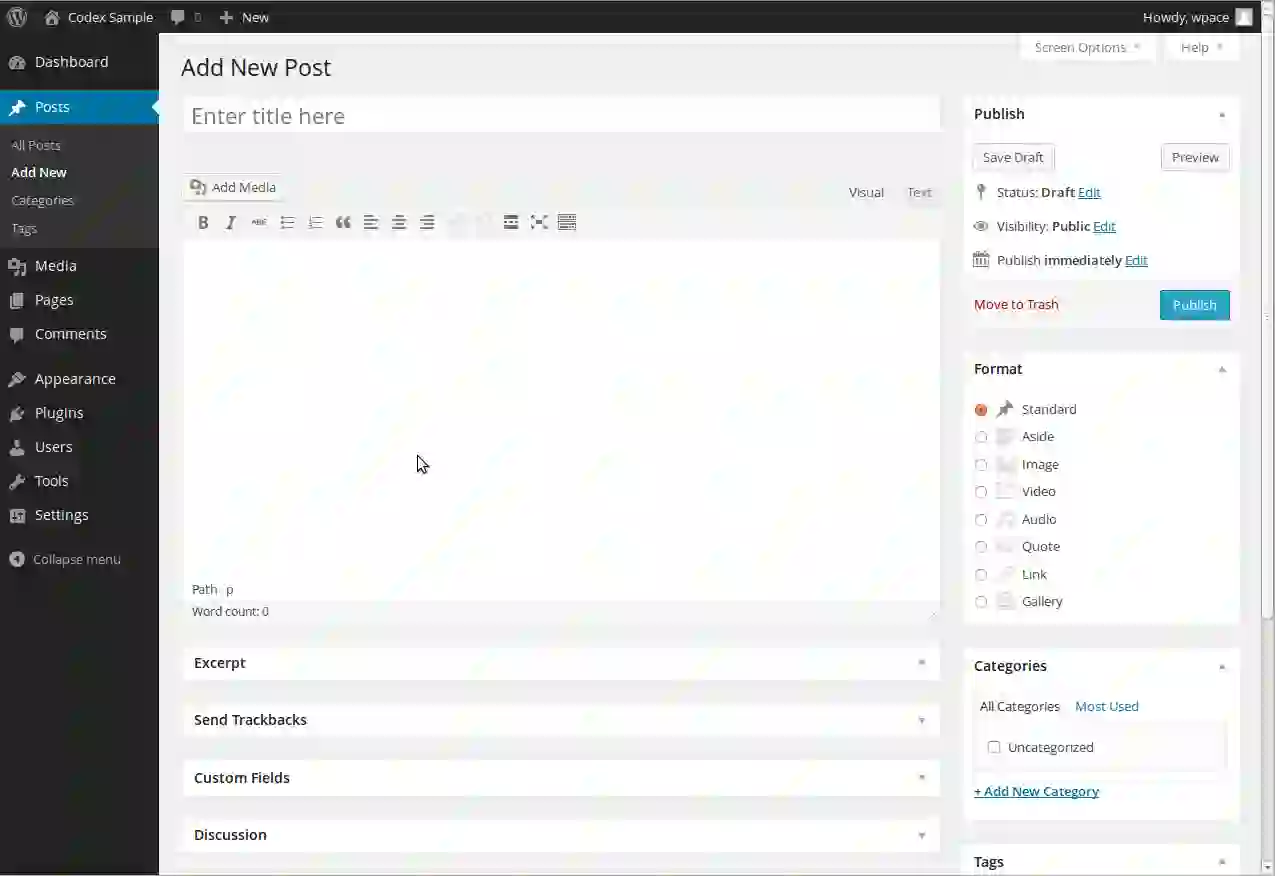
WordPress uses two types of content: posts and pages. Posts are time-sensitive content like blog updates or product announcements. Pages are static, timeless content like an About page or Contact page.
For a dropshipping store, start with a page. Go to Pages in the left sidebar and click "Add New." Give your page a title, then start building content using blocks.
The block editor works by adding pieces of content. Click the plus icon or press the forward slash key to see available blocks. You can add:
- Paragraph blocks: for product descriptions and store information.
- Image blocks: upload product photos or generate them with AI directly inside the editor.
- Heading blocks: to organize your page sections.
- List blocks: for features or specifications.
After adding your content, click the settings icon in the top right to adjust page settings. You can set a featured image and choose when to publish. When ready, click "Publish."
6. Customize Your Site Design
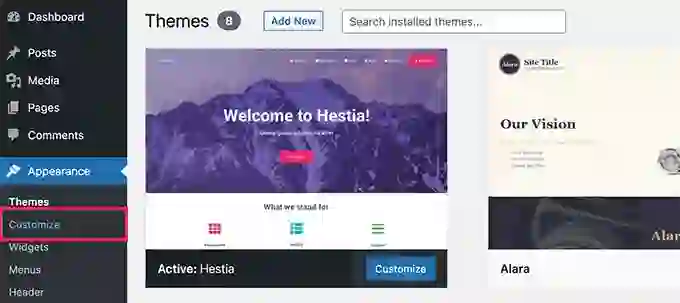
Return to your dashboard. The setup checklist recommends editing your site design next. Click this option to open the design panel where you can adjust colors, fonts, and layout.
Click on your header area to edit it. You can add a site logo by clicking the plus icon in the header block and selecting "Site Logo." Upload your logo file from your computer. Adjust the spacing and alignment until it looks right. Click "Save" when finished.
7. Launch Your Website
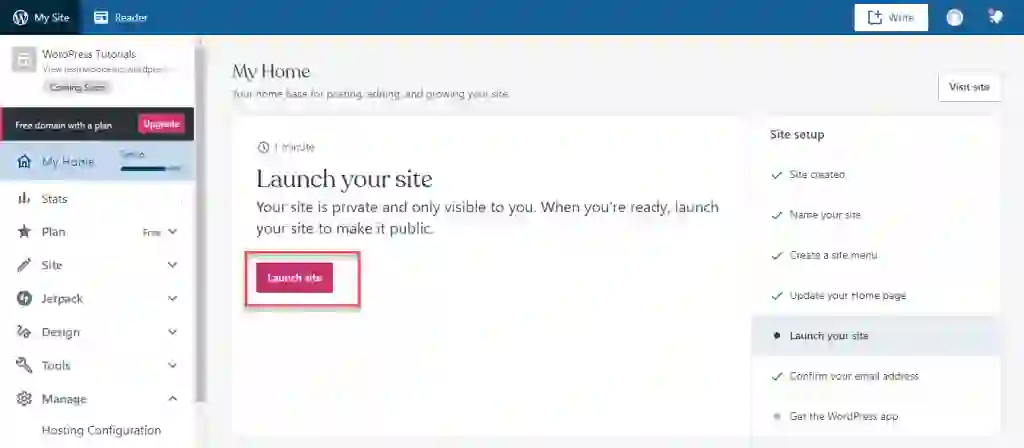
The final step in the setup checklist is launching your site. Click "Launch your site" and confirm. Your website is now visible to anyone with the URL.
8. Understand the Free Plan Limitations for Dropshipping
With the free WordPress.com plan, you have:
- A wordpress.com subdomain
- 1 GB of storage for images and files
- A small WordPress.com ad displayed on your site
- No ability to install plugins like WooCommerce or dropshipping automation tools
- No custom domain without upgrading
If you want to automate product imports and order fulfillment later, you will need to upgrade to a Business plan or switch to the self-hosted method below. For now, you can manually add products as posts or pages and handle orders through email.
Way 2: Build a Self-Hosted Free Dropshipping Store
This method uses the open-source WordPress.org software on free hosting. You get complete control, no forced ads, and the ability to install WooCommerce and dropshipping plugins. The setup takes a bit longer but gives you a professional foundation.
1. Create a Free Hosting Account with ProFreeHost
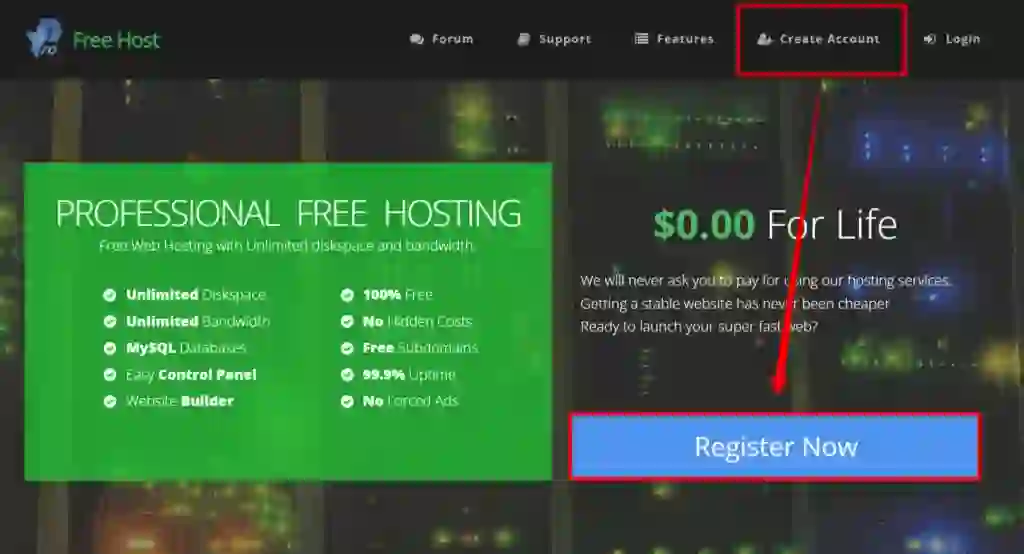
Go to ProFreeHost . Click "Register Now" and fill out the registration form. This service offers 5 GB of disk space, unlimited bandwidth, and no forced ads. Once registered, you can proceed to the next step.
2. Get Your Free Subdomain
Inside your ProFreeHost account, click "Create New" and enter your desired store name. Select your preferred subdomain extension from the available options. This becomes your website address. Click the confirmation button to claim it.
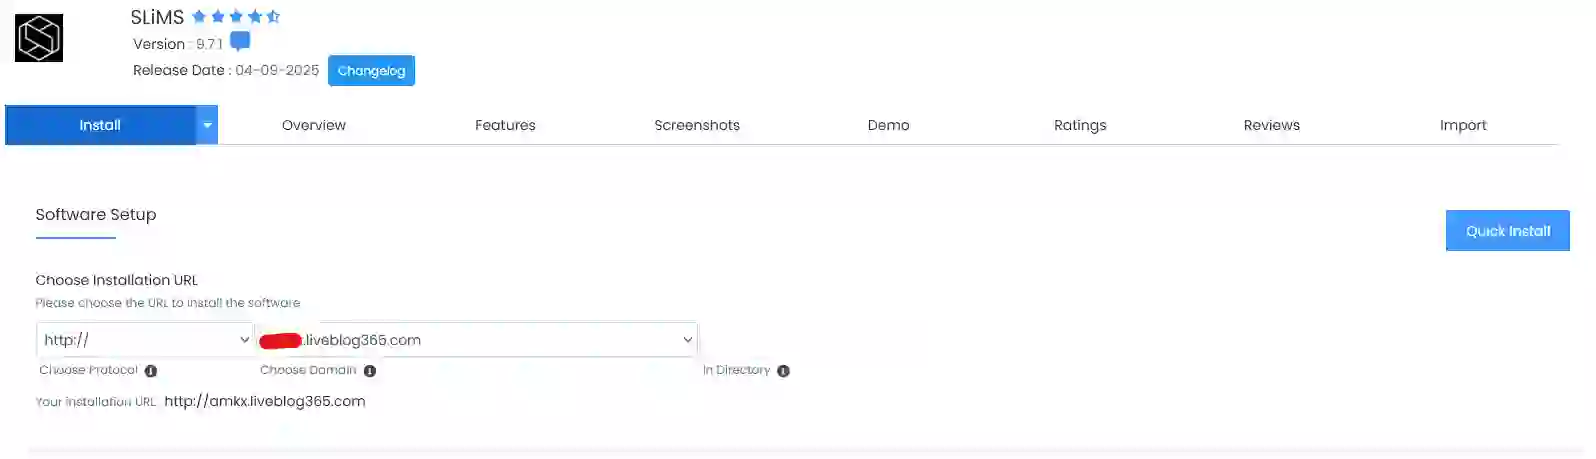
3. Install WordPress on Your Domain

Go to your ProFreeHost control panel. Scroll down to the "Softwares" section and select "Apps Installer." Find WordPress and click "Install." You will be prompted to create a WordPress username and password. Choose something secure and write it down. Click "Install" to complete the process.
Your website is now live. You can visit it using the subdomain you created. To log into your WordPress dashboard, add /wp-admin to the end of your URL and enter the credentials you just created.
4. Choose and Install a Theme
Inside your WordPress dashboard, go to Appearance and click Themes. Click "Add New Theme" and search for "Astra." This theme works well with page builders and offers many free starter templates.
Install and activate Astra. After activation, click "Get Started" and select "Elementor" as your page builder. Browse the available designs and pick one that fits your store's style. Click "Import Complete Site" to apply the design to your website.
5. Install Elementor for Drag-and-Drop Editing
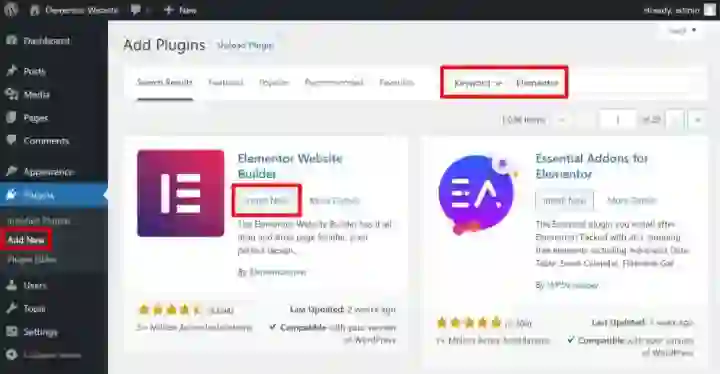
Elementor is a page builder plugin that lets you customize your site without touching code. To install it, go to Plugins, click "Add New," and search for "Elementor." Install and activate the free version.
6. Edit Your Homepage Content
Navigate to the page you want to edit and click "Edit with Elementor." This opens the visual editor. To change any text, click on it and type your own content. To replace an image, click on the image, then drag and drop a new file from your computer.
You can also use Elementor templates to create new pages quickly. Click the folder icon in the editor to browse ready-made page designs. Select one you like and click "Insert" to add it to your page. Then customize the text and images to match your brand.
7. Customize Your Header and Menu
The header area of your site includes your logo and navigation menu. To edit it, go to Appearance and click "Customize." Blue pencil icons appear next to each editable element. Click the icon next to your logo to upload a new one. Click the icon next to your menu to add or remove navigation links. Click "Publish" when you are done.
8. Add WooCommerce for Dropshipping Functionality
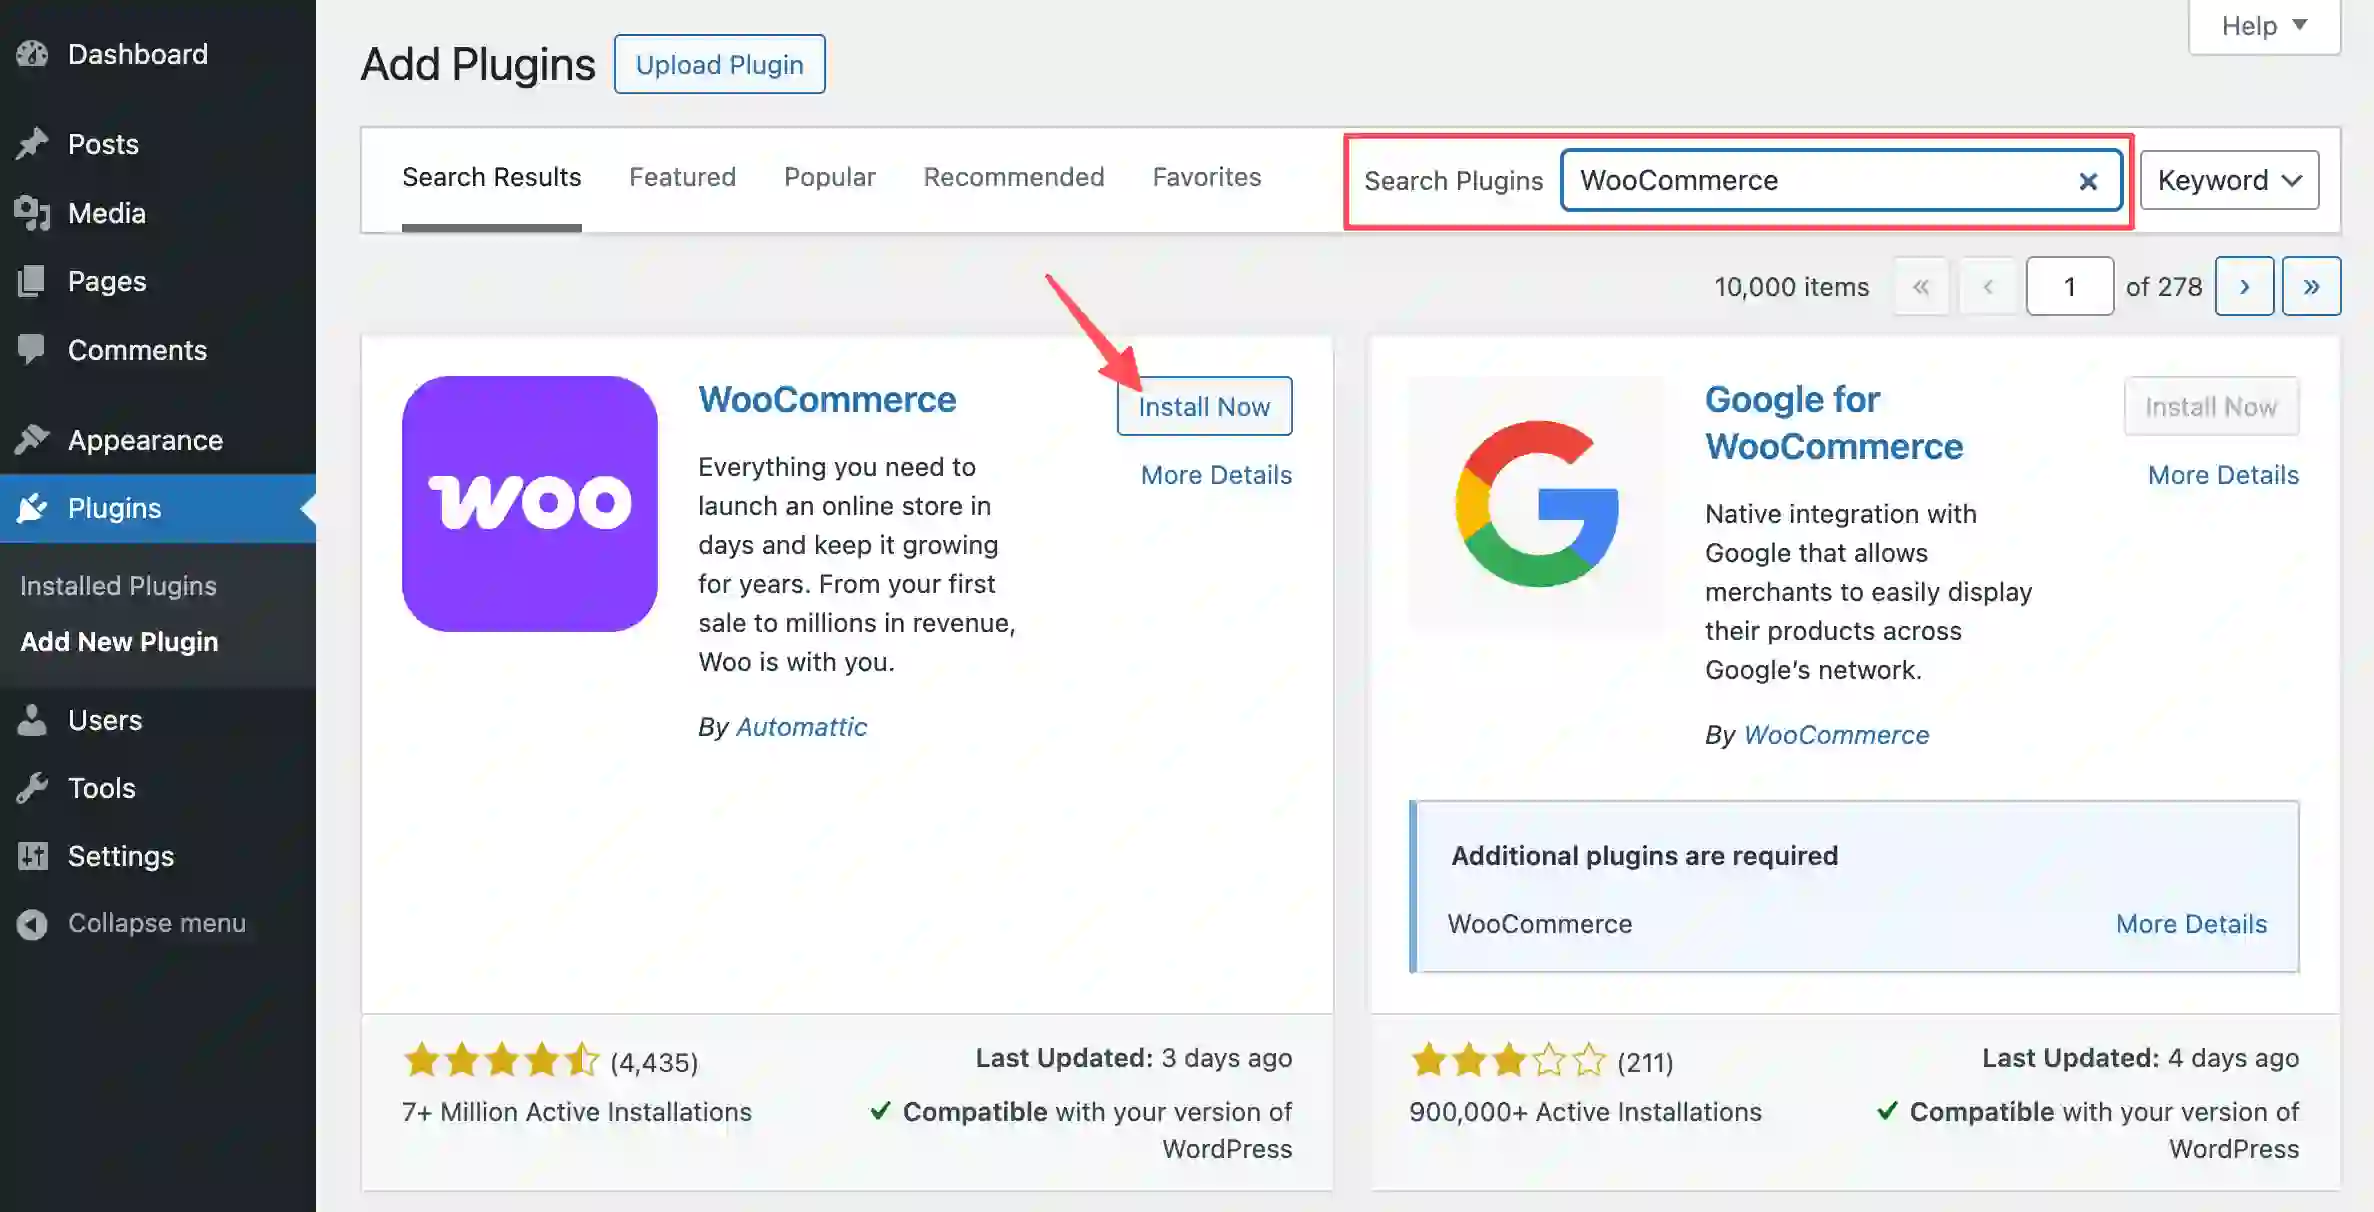
WooCommerce is the free plugin that turns your WordPress site into a full online store. Go to Plugins, click "Add New," and search for "WooCommerce." Install and activate it. Follow the setup wizard to configure your store currency, payment methods, and shipping settings.
9. Connect to Dropshipping Suppliers
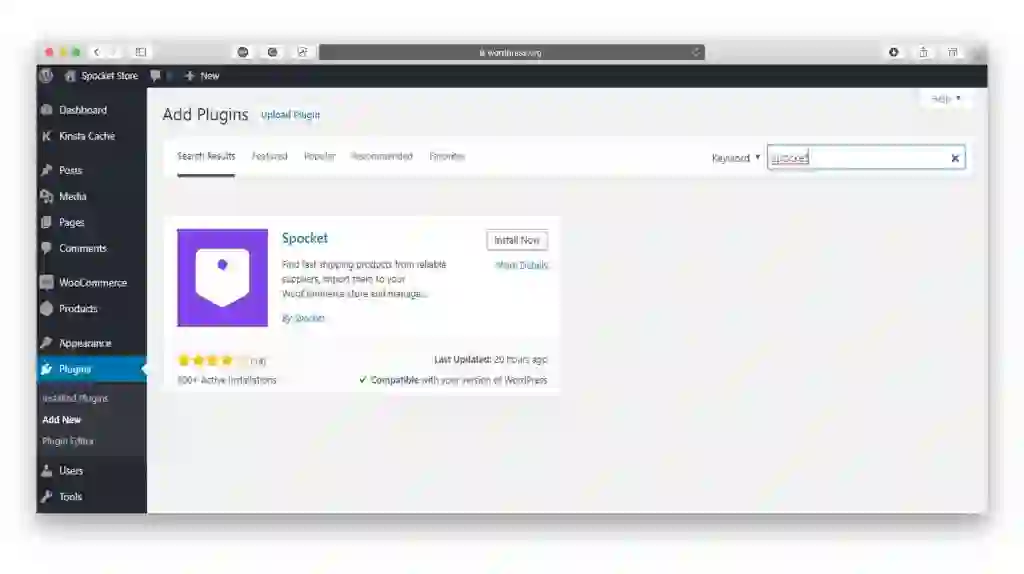
With WooCommerce active, you can connect to suppliers using plugins. Spocket offers a WooCommerce integration that lets you import products from US and EU suppliers with automated order fulfillment. You can stock trending dropshipping products directly in your store without holding inventory.
If you prefer Print-on-Demand services , Spocket also supports custom products like t-shirts, mugs, and hoodies that are printed and shipped only after a customer orders.
10. Upgrade to a Custom Domain (Optional)
Your free subdomain works, but a custom domain like yourstore.com looks more professional. To get one, purchase a domain from a registrar like GoDaddy. After purchasing, go to ProFreeHost and add your new domain under "Parked Domains." Then update your WordPress settings under Settings, General to use the new domain URL.
How to Choose a Dropshipping Niche That Works for Your WordPress Site?
Your store's success depends heavily on the niche you pick. A narrow focus makes it easier to target specific customers and stand out from larger, general retailers.
When selecting your niche, consider:
- Eco-friendly products: Reusable household items, sustainable accessories, and biodegradable goods.
- Home technology gadgets: Smart home devices, organization tools, and workspace upgrades.
- Health and wellness items: Fitness accessories, self-care products, and ergonomic tools.
- Pet products: Specialized toys, grooming tools, and accessories for pet owners.
- Custom print-on-demand apparel: Niche-specific designs on shirts, hoodies, and accessories.
You should pick a niche you understand well. If you have experience with a particular hobby or interest, start there. Your knowledge helps you write better product descriptions and connect with your audience.
Using AI Tools to Speed Up WordPress Dropshipping Store Creation
Building a dropshipping store from scratch takes time. AI tools can handle repetitive tasks so you can focus on products and marketing.
The WordPress AI website builder is available when creating a new WordPress.com site. It uses AI prompts to generate pages and layouts based on your description. The free version includes 30 AI prompts to create and polish your site.
Dropgenius is an AI-powered tool that builds dropshipping stores in minutes. You answer four simple questions about your color scheme, niche, and brand personality, and it generates a complete store with winning products preloaded. The tool integrates with WooCommerce and connects to suppliers like Spocket for automated fulfillment.
AI can also help with:
- Generating product descriptions
- Creating image variations
- Translating your store into multiple languages
- Suggesting SEO improvements for product pages
Adding Products and Managing Your WP Dropshipping Store
Once your site is built, you need to populate it with products. If you are using the free WordPress.com method, you will add products manually as pages or posts.
You should include:
- Clear product titles
- Detailed descriptions with key features
- High-quality images from multiple angles
- Pricing and shipping information
If you are using the self-hosted method with WooCommerce, you can import products directly from suppliers. Spocket allows you to browse trending dropshipping products and add them to your store with one click. When a customer orders, the supplier ships directly to them.
For better visibility, follow website product page SEO suggestions to help your products appear in search results. This includes using clear URLs, descriptive title tags, and unique product descriptions.
Top Mistakes to Avoid When Building Your Free Dropshipping Store with WordPress
Here are some top mistakes to avoid when building your free dropshipping store:
- Ignoring shipping times: If your supplier ships from overseas, customers may wait weeks for delivery. Be upfront about shipping estimates on your product pages to avoid disputes and refund requests.
- Using only supplier product descriptions: Copying generic descriptions from suppliers makes your store look like every other dropshipping site. Write your own descriptions that speak to your specific audience.
- Skipping product images optimization: Large image files slow down your site. Compress images before uploading to keep pages loading fast.
- Forgetting to test the checkout process: Place a test order yourself. Walk through every step a customer would take. Check that confirmation emails send correctly and that payment processing works.
- Neglecting mobile design: Over half of online shopping happens on phones. Preview your store on a mobile device and adjust layouts so buttons and text are easy to read and tap.
- Choosing a niche you know nothing about: If you cannot speak confidently about your products, customers will notice. Stick to areas where you have genuine interest or experience.
- Adding too many products too fast: A store with 500 random products looks messy. Start with 10 to 20 well-chosen items. You can add more as you learn what sells.
Conclusion
A free dropshipping website is within your reach. You do not need a budget, a developer, or any coding skills. You just need to pick the WordPress path that matches your business goals and follow the steps outlined above.
Start with the free option that fits your current needs. You can always upgrade later when your store grows and generates revenue. The important part is getting your first product page live and learning what your customers want. Take the first step today. Your store will be online before you know it. Want to start dropshipping? Try Spocket!
Start your dropshipping business today
How to Create a Free Dropshipping Website with WordPress? FAQs
Can I really create a dropshipping website completely free?
Yes. You can use WordPress.com's free plan with a wordpress.com subdomain or use a free hosting provider like ProFreeHost with WordPress.org software. Both options cost nothing to start.
What are the limitations of a free WordPress.com store?
You get 1 GB of storage, a WordPress.com ad appears on your site, you cannot install plugins like WooCommerce, and your domain includes ".wordpress.com" unless you upgrade to a paid plan.
Can I install WooCommerce on a free WordPress.com site?
No. WooCommerce and other plugins require a WordPress.com Business plan or higher. On the free plan, you must add products manually without automated dropshipping tools.
What is the best free theme for a dropshipping store?
Astra is a popular free theme that works well with page builders like Elementor. It offers many starter templates designed specifically for online stores and loads quickly.
How do I add products to my free dropshipping store?
On WordPress.com free, you add products as pages or posts with images and descriptions. On a self-hosted WordPress.org site, you can install WooCommerce and import products directly from suppliers using plugins like Spocket.
Can I use a custom domain with a free WordPress website?
On WordPress.com, custom domains require a paid plan. On a self-hosted setup with ProFreeHost, you can purchase a domain separately and connect it to your free hosting account.


Launch your dropshipping business now!
Start free trial.avif)


Related blogs

Best Clothing Dropshipping Suppliers: The 2026 Guide
Compare the best clothing dropshipping suppliers for 2026 — US/EU shipping speeds, pricing, and product quality — and find the right fit to launch your store.

.avif)
How to Set Global Pricing Rules on Spocket to Protect Your Margins
Learn how to configure Spocket pricing rules to protect your profit margins. Set global pricing rules, automate markups, and maximize dropshipping profits.
How to Increase Average Order Value in Your Dropshipping Store with Spocket?
Learn how to increase AOV dropshipping Spocket way. We share practical product positioning strategies, pricing, fulfillment tips.