Building Your First eCommerce Website on WordPress: A Step-by-Step Guide
Learn to build your first WordPress eCommerce site with our easy guide. Follow simple steps to start selling online.


Think WordPress is just great for blogging? Well, think again. It's a powerhouse for just about anything online—portfolio websites, forums, and, yes, even building an eCommerce site. Wait, what? That's right, your go-to for content can also transform into your very own online store.
In this article, I'll guide you through how to make an eCommerce website with WordPress. From selecting the perfect domain to setting up secure payment gateways, I'll cover all the essentials you need to launch a fully functional online store.
Reasons to Use WordPress for Online Store Creation
Why choose WordPress for your eCommerce needs? Well, WordPress offers a strong foundation for entrepreneurs looking to try their hand at online retail. Imagine wanting to integrate a custom loyalty program or a unique user interface that sets your store apart. With WordPress, you can easily add these features and more to create a bespoke ecommerce website.
Other reasons to choose WordPress for eCommerce include:
- Extensive customization. WordPress is open-source, allowing you to tailor your site with a wide range of WordPress ecommerce plugins and themes. Create a unique Wordpress ecommerce shop that stands out.
- Scalability. Start small and expand your WordPress webshop as needed. WordPress can handle increasing traffic and more complex operations without skipping a beat. Considering a change? Check out our guide on migrating from WooCommerce to Shopify.
- Cost efficiency. Operating on WordPress often costs less than other platforms, especially since there are no mandatory monthly fees. Learn more about the cost of a WordPress site.
- Complete control. From setting up basic wp e-commerce functions to integrating advanced WP ecommerce product pages, you have full control over every aspect of your site.
- SEO advantages. WordPress is designed to help improve your site’s visibility in search results, attracting more visitors and boosting sales. For a detailed guide, check out SEO for WooCommerce.
- Wide range of extensions. Integrating additional functionalities, such as payment gateways and inventory management systems, is seamless with WordPress.
If you’re thinking about setting up an online store, WordPress is a solid, flexible option that grows with your business.
Steps to Build Your First WordPress eCommerce Website
1. Choose a Domain Name
The first step to building an ecommerce website with WordPress is securing a domain name that resonates with your brand. Just like a regular website needs a domain (essentially your website's address on the internet), your WordPress ecommerce site needs one too.
Choose a domain that's memorable and relevant to your products. For example, if you sell pet supplies, names like PawsAndClaws.com or FetchFinds.shop might be perfect. If those are taken, consider using tools like Spocket’s business name generator to come up with alternative ideas.

You can check for domain availability and purchase it through registrars such as GoDaddy or directly through platforms like WordPress.com. These companies offer an all-in-one service, meaning you can buy, host, manage, and transfer (if you end up selling your store) your domain from one place.
Pro tip: If your top choice for a domain name isn't available, don’t shy away from exploring alternative names or different top-level domains (TLDs) like .store or .shop. These can add a unique twist to your WordPress online shop’s URL and still capture your brand’s essence.
2. Find a WordPress eCommerce Hosting Provider
The second step in setting up your eCommerce site on WordPress is picking the right web hosting service. Your choice of web host can make or break your online success. Say you launch a big sale; a good web host can mean the difference between a smooth experience and a site that crashes under pressure. That’s why choosing reliable WordPress hosting is key, it’s built to handle WordPress sites efficiently and can support your store as it grows.
When choosing your web host, consider these important factors:
- Performance: Fast loading times are a must. Imagine a shopper clicking your site and having to wait... and wait. They’ll bounce. Make sure your host uses the latest tech to keep your pages zipping along.
- Support: Things might go sideways sometimes. When they do, you’ll want quick and knowledgeable help. Good support can fix a crisis before it turns into a disaster.
- Reliability: Your host should promise near-perfect uptime. Think of it as the reliability of your shop's open sign. If your website goes down, sales stop. Make sure they guarantee that your site stays accessible all day, every day.
- Scalability: As your store grows, your hosting needs will change. Choose a host that offers easy upgrades to handle increased traffic and storage needs without disruption. In case your hosting provider can't support your needs, you will need to use WordPress multisite migration to migrate your website to a new host that can handle your growing needs.
Popular hosting options
Bluehost WooCommerce
Thinking of setting up your WordPress shopping website but worried about the tech stuff? Bluehost simplifies everything. They offer a super easy setup with a free domain name and one-click WooCommerce install, so you can get your store up and running quickly—even if tech isn't your thing.
Hostinger WooCommerce
Hostinger's WordPress hosting plans with WooCommerce support are perfect for beginners. You'll also get perks like daily backups, free SSL, and a free domain, all starting at a wallet-friendly price.
SiteGround Cloud
Their cloud hosting service is optimized for popular eCommerce applications like Magento and WordPress, making it a great fit if you're looking to build a resource-heavy online store.
3. Install WordPress
To set up WordPress for ecommerce, you can choose from the following two methods:
One-click method (the easiest)
Did you know getting WordPress started could be as simple as a single click? If you choose a hosting provider that offers the 'one-click' install feature, you're in for a smooth ride. Just sign up, head to your hosting dashboard, and click 'Install WordPress.' It’s the quickest way to get your site off the ground.
Manual installation (has some learning curve):
If your hosting provider doesn't offer one-click installations, no worries. You can still manually set up WordPress. This method involves downloading the WordPress software to your computer and then uploading it to your hosting account. It's a bit more hands-on and comes with a learning curve, but it’s a great way to understand the inner workings of your site. Plus, there are tons of tutorials and guides out there to help you through the process.
For a detailed WordPress setup checklist, you can refer to the WordPress setup checklist.
Both methods will prepare your hosting environment for creating an ecommerce WordPress site.
4. Configure WooCommerce
To add ecommerce to WordPress, you'll need to install a plugin named WooCommerce. WooCommerce is software designed to transform your WordPress site into an online store. It comes with all the core functionalities needed to sell products or services directly from your site.
Learn how to set up and manage a successful subscription service via WordPress.
Start your dropshipping website with WordPress using our expert tips.
To install WooCommerce, go to the plugins area in your WordPress dashboard and click "Add New." Next, type "WooCommerce" in the search bar and find the official plugin. Once you see it, click "Install," wait a few minutes, and then click "Activate."
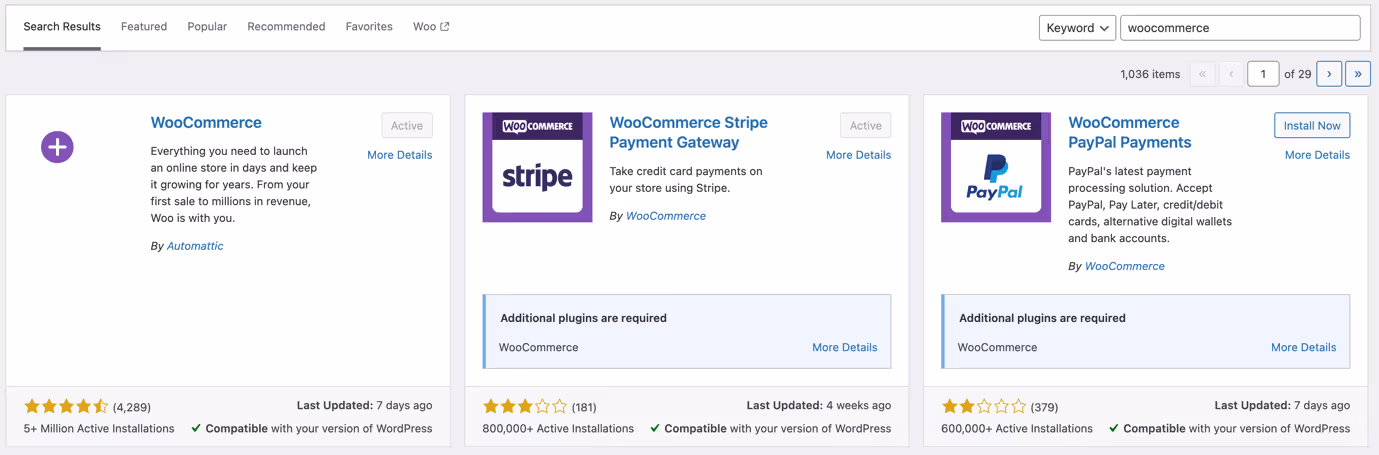
You'll now see a setup wizard prompted by WooCommerce. This wizard will guide you through configuring important settings such as your store's location, preferred currency, shipping options, and tax details. Take your time to follow these steps to ensure your WordPress online store is set up properly to meet your business needs. For a step-by-step guide, check out this WooCommerce setup tutorial.

5. Pick a Theme
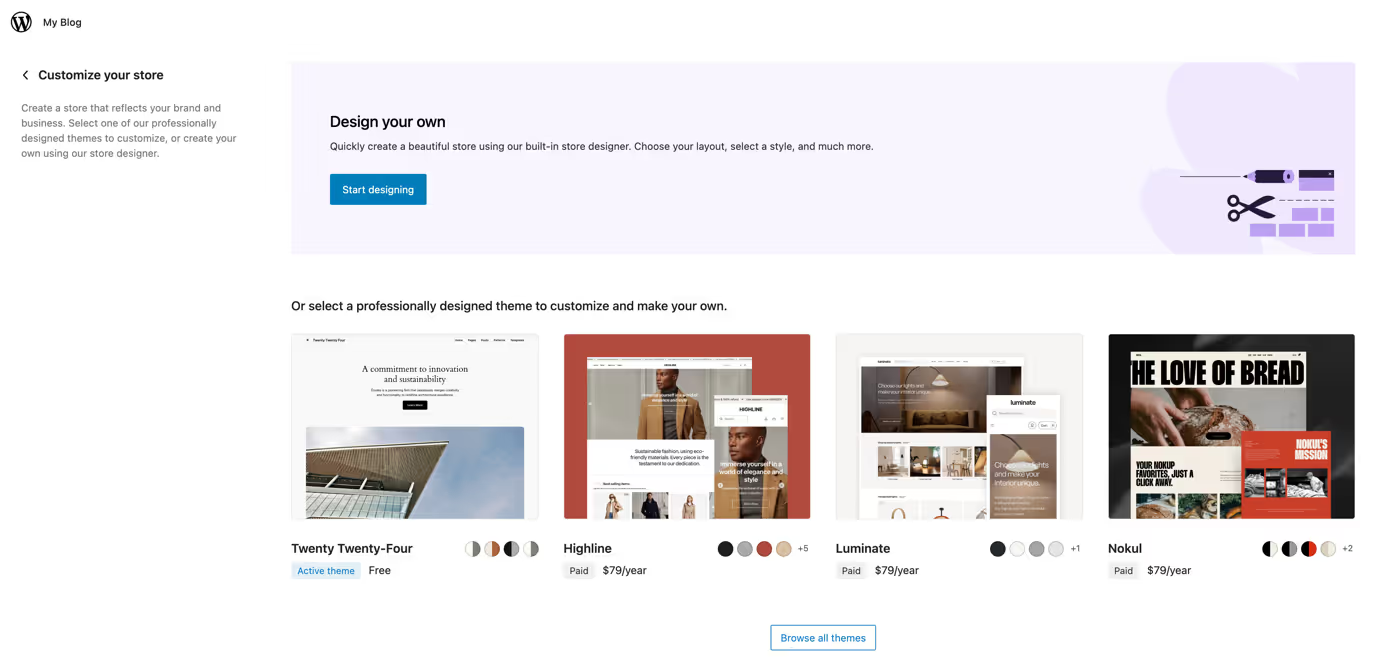
The most successful WordPress online stores have themes that pop. WordPress gives you the chance to pick one that’s all your own. But don’t consider this just a free pass to choose any theme. You’ve got to pick one that works well with WooCommerce and matches the vibe of your store.
You can explore tons of themes, both free and paid, in the WordPress Theme Repository or via third-party theme providers. Once you find one that feels right, go ahead and install it, then activate it. To get some ideas, check out these best WooCommerce themes.
Make sure the theme you choose fits your brand like a glove. Keeping your design, colors, and fonts consistent is key. It builds trust and makes your store recognizable. Plus, a theme that reflects your brand well can boost customer engagement and keep them coming back for more. Learn how to build a custom WordPress theme tailored to your eCommerce needs.
6. Configure Settings, Products, and Payments
Setting up your WordPress e-commerce site with WooCommerce involves a few steps to ensure everything runs smoothly. Here’s how to configure your settings and start adding products and categories.
WooCommerce Settings
To manage your store effectively, you’ll deal with several settings:
- General Settings control the basics like money, products, and how checkouts are handled. Get more out of your efforts with effective marketing plugins for WordPress
- Account Settings cover things like signups and privacy—super important for customer trust.
- Email Settings handle the messages sent from your store to your customers.
- Product Settings lets you tweak how items are displayed and manage stock levels.
- Shipping Settings are for setting up delivery choices and costs, crucial for keeping customers happy with their buying experience.
- Payment Settings dictate how customers can pay you, which is the heart of ecommerce on WordPress. Check out the best WooCommerce plugins for enhancing these functionalities.
For more guidance, check out this WooCommerce settings guide, which walks you through each of these key areas.
Adding Product Categories
Before you start adding products, you'll want to organize them. Categories help people find what they want faster. For example, if you sell clothes, you could have categories like “Men,” “Women,” and “Kids.” To add categories, go to WooCommerce > Products in your dashboard, then click “Categories.”
Adding Products
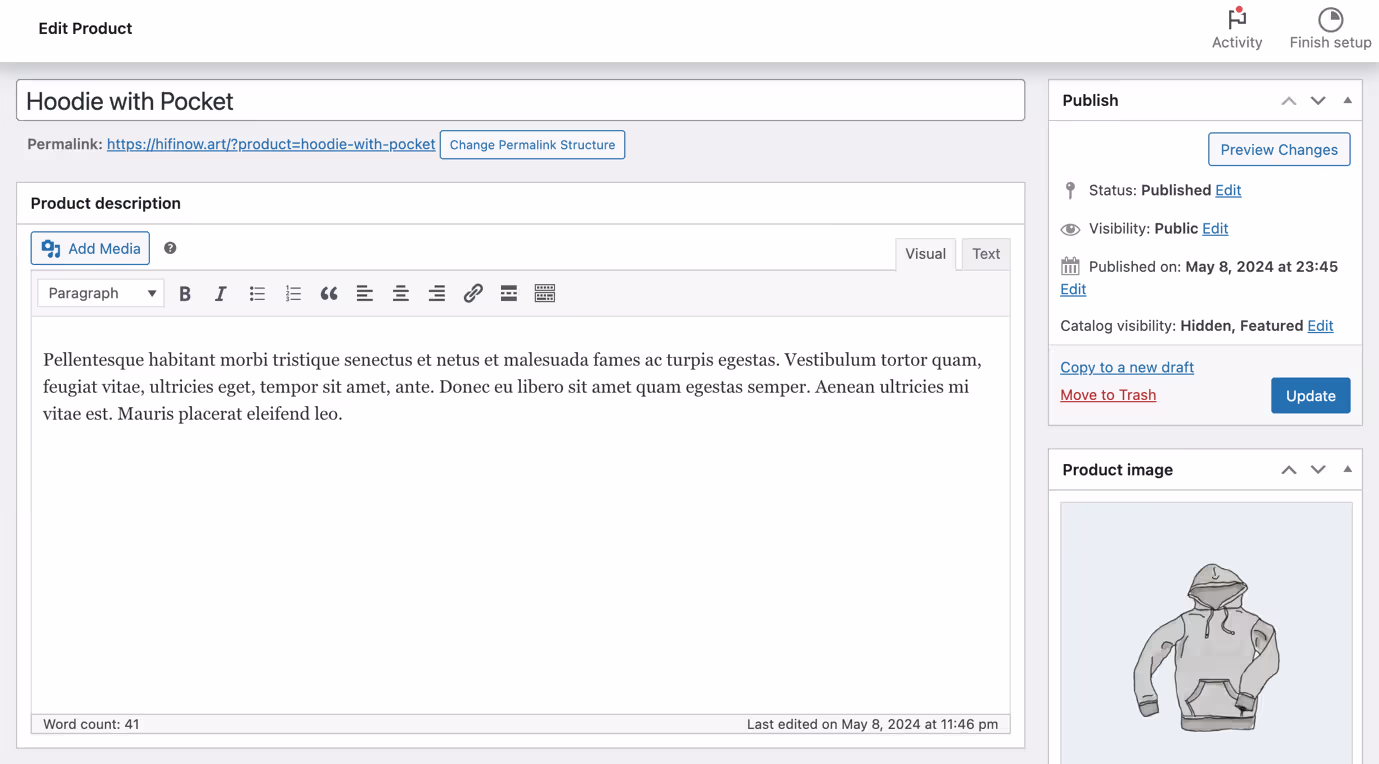
You can add products to your WP e-commerce store one at a time or in bulk using a CSV file. To add them individually:
- Go to Products > “Add New.”
- Enter the product name and description, and upload your product image.
- Choose a product type, set the price, and manage inventory levels.
- On the right-hand sidebar, set product categories and tags.
- Once you're satisfied with everything, click “Publish.”
Moreover, you can track your product stock with WooCommerce’s inventory management tools, ensuring you never sell more than what you have. Explore how to effectively sell digital products on WordPress for maximum profit. When you need help understanding the complete picture of e-commerce on WordPress, try this guide on building a successful WordPress e-commerce store to learn best practices and strategies for long-term success.
Configure Payments
Next up on your WordPress setup? Getting those payment gateways ready for your customers. WooCommerce supports a bunch of payment options like PayPal, Stripe, and credit card payments.
Just head to the “Payments” tab in the WooCommerce settings and pick the methods you want to use. It's good to compare the payment processing rates to find what best fits your business needs.
Protect your site with the best security plugins for WordPress.
7. Create Beautiful Product Pages
When you're setting up e-commerce in WordPress, getting the look of your store just right is key. Start with the main pages—your homepage, product pages, and checkout pages. Tools like Gutenberg let you style these pages beautifully without needing to write code.
To elevate your product pages and make the shopping experience even more engaging, use:
- Product Recommendations: You can suggest other items that customers might like based on what they're currently viewing. It’s a clever way to increase sales.
- Product Video for WooCommerce: Another great tool is adding videos to show off your products in action. This is perfect for products that have lots of features or moves.
- Variation Swatches: Use photos or swatches to show different product options. This helps customers see all the choices and pick their favorite.
- WooCommerce 360º Image: Let customers view your products from every angle with a 360º image. This is especially great for products where appearance and details are super important.

By taking these steps, you can create a WordPress for commerce site that both looks good and provides a memorable user experience. Enhance the user experience on WordPress for better customer satisfaction.
8. Optimize checkout experience
Optimizing your WooCommerce checkout can boost sales and simplify the process for your customers. Here's how you can make your checkout smoother:
- Offer multiple payment options: Why not include various payment methods like credit cards, eWallets, and mobile payments? This flexibility meets customers' preferences and can also reduce cart abandonment.
- Simplify the checkout: Do you need a phone number or company name? If not, skip it. Removing unnecessary fields speeds up transactions.
- Display security badges: Showing security badges and SSL certificates on your checkout page can build trust. When customers feel their information is secure, they're more likely to complete their purchases.
- Enable guest checkout: Allowing customers to buy without setting up an account makes their experience faster and less intrusive. Not to mention, it encourages more people to complete their purchases because it's just simpler.

These steps are crucial for any ecommerce website development aimed at creating a checkout experience that's hassle-free and likely to lead to repeat customers.
9. Install Essential Plugins
A DIY ecommerce website needs some plugins to enhance functionality and ensure smooth operation. Some of the essential WordPress plugins include:
Advertising Plugins
To drive more traffic to your store, utilize advertising plugins that connect with platforms like Google Ads and Facebook advertising. Advanced Ads offers detailed control over your advertising campaigns, improving targeting and ad placement.
Conversion Optimization Tools
Optimizing your conversion rate is crucial. Plugins like OptinMonster boost email signups and other conversion opportunities. They also offer A/B testing tools, allowing you to refine your approach based on actual performance data.
Dropshipping Plugins
For those focusing on dropshipping, Spocket for WooCommerce is invaluable. It integrates seamlessly into your store, automating significant portions of product and order management.

10. Build Legal and Policy Pages
Don’t overlook the legal aspects of running your ecommerce with WordPress. Creating policies and legal pages for your WooCommerce store is a must. Think about your Terms & Conditions, Return Policy, and Privacy Policy. You can use online generators to draft these documents and then tweak the content to fit the specifics of your store.
11. Optimize Images
On every ecommerce website WordPress checklist, you’ll find image optimization. Why? Because properly optimized images speed up your site and enhance user experience. Here’s how to handle it:
- Resizing dimensions: Tailor your image sizes based on necessity. Smaller images suffice for simpler products but go bigger for those with details needing a closer look.
- Image compression: Use tools like Imagify to compress images upon upload. This keeps your pages loading quickly without sacrificing image quality.
- Using a CDN: Implement a Content Delivery Network to speed up image loading times globally. Check with your hosting provider as they might already offer CDN services like Cloudflare.

These steps ensure your WordPress e-shop remains swift and appealing, preventing slow load times from deterring your customers. Learn about effective WordPress speed optimization techniques for better performance.
12. Tweak for SEO
Boosting your SEO is crucial for climbing search engine rankings and attracting more visitors to your online store WordPress. Here’s how to refine your SEO strategy:
- Craft your meta descriptions: Write engaging meta descriptions. They appear in search results, so make them catchy and packed with key phrases that reflect the page content.
- Use an SEO plugin: Install a reliable SEO plugin like Yoast SEO. It’ll help you manage sitemaps, and meta tags and optimize keywords effectively.
- Simplify URLs: Keep URLs clean and focused on keywords. Simple URLs are easier for both search engines and visitors to understand.

By following these steps in your WordPress ecommerce tutorial, you’ll set up a site that’s optimized for search engines—helping to increase traffic and sales.
13. Go Live
Now that you've configured everything and set up your pages, it's time to make your site public. Launching your WordPress ecommerce site means you're opening the digital doors to customers and starting a new chapter in your business journey.
Consider this your virtual ribbon-cutting moment. Before you hit that launch button, double-check everything one last time. Ensure all your settings are correct, your pages look fantastic, and your products are ready to go. It's like checking the mirrors before you drive off—safety first!
Then, it's time to go live. Announce your launch across your social media channels, email subscribers, and any other marketing platforms you use. For more guidance, check out the guides on social media marketing for WooCommerce and email marketing for WooCommerce. This initial buzz can drive your first wave of customers, and their interactions can provide immediate feedback on any areas that might need a quick tweak.
Building Your First eCommerce Website on WordPress FAQ
Does WordPress have ecommerce?
Yes, WordPress supports ecommerce functionalities primarily through the WooCommerce plugin. WooCommerce seamlessly integrates with WordPress, allowing users to sell products or services online.
How to create an ecommerce website in WordPress?
- Install WordPress.
- Install the WooCommerce plugin.
- Configure WooCommerce settings.
- Add products or services.
- Set up payment options.
- Design your store with themes.
- Launch your site.
Where can I find WP ecommerce tutorials?
You can find WP ecommerce tutorials on a variety of platforms like YouTube, which offers detailed video guides. Websites like WPBeginner or the official WooCommerce blog also provide comprehensive tutorials and step-by-step guides tailored to all levels of users, from beginners to advanced.
Start your dropshipping business today


Launch your dropshipping business now!
Start free trial


Related blogs
Top WordPress eCommerce Themes for 2026
Explore the best WordPress eCommerce themes for 2026. Compare WooCommerce themes by speed, design, features, and dropshipping potential.


Saba Mohebpour Didn't Stop at Spocket: His New $50M Fund, ILA Capital, Is Buying Up Shopify and Amazon Apps
After building Spocket into a major ecommerce platform, Saba Mohebpour is launching ILA Capital with a $50M strategy to acquire Shopify and Amazon apps powering modern ecommerce.


Top Trendsi Alternatives for Fashion Dropshipping
Explore the best Trendsi alternatives for fashion dropshipping, fast shipping, branding, Shopify integration, and reliable suppliers.