A Beginner’s Guide to Card Sizes
Here is a beginner’s guide to different card sizes. Whether it’s for fun, starting a business, promotions, or anything else, we’ve got you covered!


Ever printed a card that looked great on screen but totally flopped in print? You’re not alone. Whether you're designing business cards, playing cards, flashcards, or even tarot decks, the size of your card plays a huge role in how it functions and feels. It’s not just about dimensions—it’s about usability, visual impact, and compatibility with sleeves, holders, and expectations.

Imagine designing cards that not only look sharp but also print flawlessly—every time. That’s exactly what you’ll learn in this guide. We’ll demystify card sizes, break down standard formats, and help you understand why these tiny dimensions make a huge difference.
So, if you’re ready to make informed decisions and create cards that work as beautifully as they look, let’s dive in.
Why Card Sizes Matter?
You wouldn’t wear shoes that don’t fit, right? The same logic applies to card sizes. Whether you're designing for fun, education, or business, getting the dimensions right is absolutely crucial. Why? Because the size of a card directly impacts usability, aesthetics, cost, and even professionalism.
Let’s say you're creating a flashcard deck. If your cards are too small, they’re hard to read and write on. Too big? They’re clunky and hard to handle. And if you’re printing business cards, dimensions matter even more. Too large and they won’t fit in wallets; too small and your contact info might be unreadable. For playing and trading cards, sticking to the standard sizes ensures they fit into sleeves, albums, and hands comfortably.
Card size even affects production costs. Printers work with standard dimensions, so oddball sizes might cost more, take longer, or even mess up your bleed and safe zone settings (we’ll get into that soon). Plus, if you're designing to sell, sticking to conventional sizes makes your cards more appealing—customers know what to expect and how they’ll use it.
Ultimately, choosing the right size is about more than just numbers. It’s about function, efficiency, and a seamless user experience. When your card dimensions match the purpose, your design stands out—and works flawlessly.
All About Standard Card Sizes
Here is a guide to to the different standard card sizes and what you need to know about them:
Playing Cards
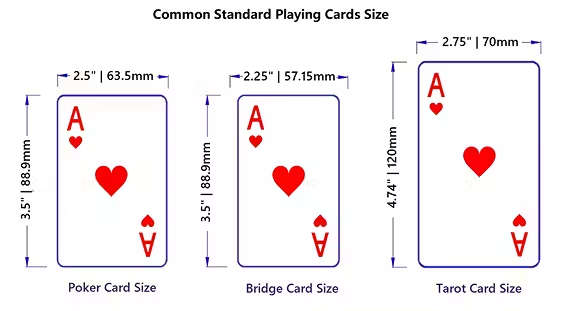
When it comes to card sizes, playing cards are the gold standard. The most common size is 2.5 x 3.5 inches (63.5 x 88.9mm), also known as poker size. Why this specific measurement? Because it's the sweet spot for ergonomics—big enough to show artwork or information, small enough to shuffle easily and hold in one hand without a struggle.
This size didn’t happen by accident. Over time, game designers and manufacturers realized this dimension offered the perfect balance between functionality and aesthetics. It fits well into protective sleeves and standard deck boxes. It’s also universally recognized, which means your audience knows what to expect when they pick up your cards.
This format is ideal not only for classic playing cards but also for modern card games and custom decks. If you're creating a game or collectible deck, sticking to the 2.5 x 3.5 inch format ensures your cards will be compatible with accessories on the market.
Whether you’re printing a standard 52-card set or building an elaborate game with unique rules, this tried-and-true size is your safest bet. It’s familiar, comfortable, and optimized for performance—exactly what you want in a deck.
Tarot Cards
Tarot cards aren’t just for fortune telling—they’re a visual experience. That’s why their standard size is a bit larger than typical playing cards: 2.75 x 4.75 inches (70 x 120mm). This extra space gives artists room to include rich symbolism, intricate designs, and storytelling elements that define each card’s meaning.
Unlike poker-sized cards, tarot decks are usually held in two hands when reading. The size is intentional—it enhances the immersive experience and allows readers and clients alike to fully engage with the visuals. Plus, the added height offers a graceful look when laid out in spreads, creating a dramatic and meaningful visual flow.
If you're designing your own tarot deck, this size is the best starting point. It’s widely accepted in the metaphysical community and fits most tarot pouches and boxes. It’s also more comfortable to shuffle than oversized “oracle-style” cards while still offering enough room for visual creativity.
While you could experiment with smaller or larger sizes, staying within the 2.75 x 4.75 inch range will help your deck feel familiar, professional, and easy to handle—exactly what readers look for when choosing their next favorite deck.
Trading Cards
If you've ever collected Pokémon, Magic: The Gathering, or sports cards, then you're already familiar with trading card dimensions: 2.5 x 3.5 inches (63.5 x 88.9mm). Yep, same as playing cards—and that’s no coincidence. This consistency makes it easy to store, protect, and display cards across brands and franchises.
Trading cards rely on their size for functionality. They're meant to be swapped, stacked, and displayed in sleeves or binders. A uniform dimension helps keep everything neat and collectible. Deviating from this standard might make your cards stand out—but not always in a good way. Custom sizes might not fit standard 9-pocket sheets, making organization a pain for collectors.
From a design perspective, this size offers just enough space for a great image, a border, and text with stats, trivia, or backstory. Whether you’re creating cards for a game, education, or fandom, this format gives you just the right real estate to make it all work.
If you’re making your own trading cards, staying with the 2.5 x 3.5 inch format means your audience will be able to integrate your cards into their collections seamlessly. And honestly? That kind of usability is collector gold.
Flashcards
Flashcards are all about learning, and their size can make or break how effective they are. The two most common flashcard sizes are 3 x 5 inches (76 x 127mm) and 5 x 7 inches (127 x 178mm). The smaller size works great for quick facts, vocabulary, and simple Q&A. The larger size? That’s your go-to for diagrams, charts, or anything that needs more writing room.
Teachers love them because they’re tangible, portable, and customizable. Students love them because flipping through a stack is faster and more effective than scrolling a screen. Plus, writing it down helps commit it to memory—that’s a win-win for any learner.
If you’re creating your own flashcards—whether for education, language learning, or test prep—start with the 3 x 5 inch format. It’s easy to carry and fits well in hands or pockets. But don’t be afraid to scale up if your content demands more space. Some creators even use custom sizes when designing specialized decks for kids, medical terms, or niche subjects.
Bottom line: Choose your size based on how much info each card needs to carry. When size and content match, learning becomes a whole lot smoother.
Business Cards

If you’ve ever slipped a business card into your wallet or handed one over at a networking event, you already know the importance of size. The standard North American business card measures 3.5 x 2 inches (88.9 x 50.8mm). It’s compact, professional, and fits neatly into wallets, card holders, and pockets without awkward bulging or corner bending.
This size isn’t just about convenience—it’s branding real estate. You’ve got a tiny canvas to showcase your logo, contact info, tagline, and maybe even a QR code. It needs to be readable, visually balanced, and polished.
Most printing services are optimized for this format, so sticking to it ensures a smoother production process. Go too large and your card might get tossed; too small and it might look amateurish. The sweet spot? Right at that 3.5 x 2 inch mark.
Of course, there are other options—square cards, mini cards, vertical layouts—but those are best when you're making a statement. For day-to-day professionalism, the standard size reigns supreme. It’s a global visual cue that says, “Here’s who I am, and I mean business.”
So, when designing business cards, size matters just as much as style—and the standard works for a reason.
Greeting Cards
Greeting cards come in all shapes and sizes, but there are a few standard formats that dominate the shelves—and for good reason. One of the most popular is the A7 size, which measures 5 x 7 inches (127 x 178mm). It strikes a perfect balance: large enough to write a heartfelt message, but compact enough to mail easily.
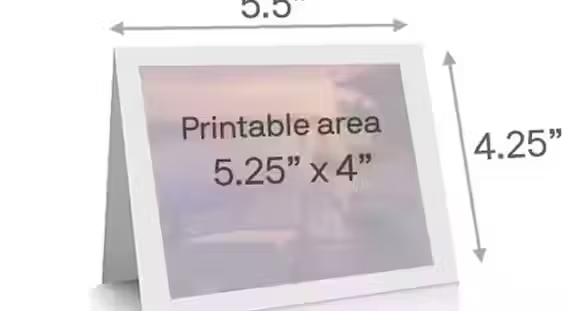
Other common sizes include A2 (4.25 x 5.5 inches) and Square (5.25 x 5.25 inches). Each size carries its own vibe. A7 feels classic and formal—perfect for weddings, birthdays, and thank-yous. A2 is casual and cost-effective, great for holiday cards or quick notes. Square cards are more modern and artsy but can cost extra postage to mail.
If you’re designing your own greeting cards, think about more than just aesthetics. Will it fit into a standard envelope? Will the post office accept it without charging extra? And how much space do you need to deliver your message?
While custom cards are fun and creative, starting with standard dimensions helps you keep things simple, affordable, and practical. Whether you're designing for laughs, tears, or congratulations, the right card size ensures your message hits home—literally and emotionally.
The Basics of Card Design

Here are the basics of card design for beginners:
Trim Size vs Layout Size
When it comes to card design, it’s not just what you see—it’s how much space you’re actually working with. Two key terms you’ll need to understand are trim size and layout size.
Trim size is the final size of your card after it’s printed and cut. For example, if you’re designing a standard business card, the trim size is 3.5 x 2 inches. That’s the physical card someone will hold in their hand.
Layout size, on the other hand, includes extra space around the trim edges. This area accounts for bleed, cutting tolerances, and other print requirements. You’ll usually design your layout slightly larger—maybe 3.75 x 2.25 inches for that same business card—to give printers room to work their magic.
Here’s why it matters: if you only design to trim size, your background or artwork might get sliced off unevenly. But if you account for layout size, you’ll maintain control over what stays and what goes during cutting.
Bottom line: Always design with the layout in mind, not just the trim. That’s how you make sure your cards look professional—down to the last millimeter.
Bleed Areas
Bleed areas are one of the most overlooked yet essential parts of designing cards. What are they? In simple terms, a bleed area is the extra space around your card’s edges that gets trimmed off after printing. It’s usually around 0.125 inches (3mm) on each side.
Let’s say you’re printing a card with a red background. If you don’t extend that red background into the bleed area, the final product might show thin, ugly white lines along the edges due to slight cutting misalignments. That’s not a good look—especially if you want your card to appear polished and professional.
For example, if your business card has a trim size of 3.5 x 2 inches, your file should be set up as 3.75 x 2.25 inches to include bleed. This gives printers enough leeway to cut your card cleanly without risking any awkward borders or chopped content.
So whenever you’re designing a card, treat the bleed zone as a safety net. Extend backgrounds and edge elements all the way through the bleed. That way, no matter what, your final card looks sharp, clean, and exactly how you intended it.
Safe Zones for Printing
If bleed areas are the buffer zones outside the trim, safe zones are the secure spaces inside. They ensure that no critical design elements—like text, logos, or icons—get trimmed off during cutting.
Printers aren’t robots (well, not entirely). There’s always a tiny margin of error during the trimming process. That’s why most designers use a safety margin of about 0.125 to 0.2 inches (3–5mm) inside the trim lines. Inside this zone is where all the vital information should live.
Let’s put it in context: if your business card is 3.5 x 2 inches, keep all text and important graphics within 3.1 x 1.6 inches. That gives your design breathing room and protects your content from accidental decapitation—because no one wants a card with half their phone number missing.
Safe zones also help improve visual hierarchy. By keeping essential info centralized and aligned within this space, you enhance readability and give your card a neat, clean look.
Pro tip: Think of safe zones as the no-fly zone for trimming blades. Stick to them, and your designs will look crisp and intentional every time.
Layout and Content Optimization
Here’s what you need to know:
Optimizing Layout for Standard Sizes
Designing a card isn’t just about filling up space—it’s about using space wisely. Layout optimization means structuring your design to make the most of your card’s dimensions, no matter the format:
- First, stick to industry standards when possible. A 2.5 x 3.5 inch poker card, a 3.5 x 2 inch business card, or a 5 x 7 inch greeting card—these sizes have been tried, tested, and perfected. Using these ensures compatibility with sleeves, holders, and printing equipment.
- Next, always design with bleed and safe zones in mind. Extend backgrounds to the bleed area (typically 0.125 inches beyond the trim) and keep important elements inside the safe zone (about 0.2 inches from the trim). This protects your design from mishaps and gives it a polished edge.
- Also consider hierarchy—what do you want people to see first? For example, names and job titles on a business card should be more prominent than addresses. For game cards, the artwork might be the star, but key stats should still be legible.
- Lastly, test before you print. Create mockups or prototypes to see how your design translates to physical form. It’s the best way to avoid layout disasters and fine-tune for clarity and style.
Strategic Content Placement
Great card design isn’t just about color and fonts—it’s about where everything goes. Content placement guides the eye, prioritizes information, and makes your card instantly more effective.
Start by deciding what matters most. On a business card, that’s your name and contact info. On a flashcard, it might be the question on one side and the answer on the other. For a playing or trading card, maybe it’s the artwork front and center, with supporting text below.
Hierarchy is key. People scan cards quickly, so place the most important information where their eyes will land first—typically the center or upper third. Use font size, bolding, and spacing to lead them through the content. Keep margins in mind too. No one likes a crowded card. Give elements room to breathe, and avoid placing anything important near the edge—remember those safe zones.
And be consistent. If you’re designing a set—whether it’s a card game or a stack of flashcards—keep layouts uniform. That consistency helps users navigate the information more intuitively and creates a cohesive visual experience. Smart content placement doesn’t just make your cards prettier—it makes them work harder, faster, and better.
How to Choose the Right Card Size
Choosing the right card size starts with one question: What is the card for? Function drives form. If your card will be shuffled, drawn, or carried in a pocket, that impacts everything from your material choice to your final dimensions.
For gaming cards like Pokémon or Magic, stick to the standard 2.5 x 3.5 inches. It ensures compatibility with sleeves and storage. Designing tarot or oracle cards? Opt for 2.75 x 4.75 inches or larger to make artwork shine and symbolism easy to interpret.
Business cards should stay at 3.5 x 2 inches for universal wallet fit. Want to stand out? Try square or vertical formats—but remember, nonstandard cards may get tossed if they don’t fit cardholders. Flashcards vary: 3 x 5 inches is great for portability, 5 x 7 inches for more detailed content. Greeting cards are usually A7 (5 x 7 inches), but you can scale based on formality and mailing needs.
Conclusion
Card sizes might seem like a small detail, but they can make or break your final product. Whether you’re designing for fun, business, or education, knowing your dimensions helps you create cards that look sharp, function smoothly, and leave a lasting impression.
From layout planning to printing precision, every decision starts with size. Now that you’ve got the know-how, you’re ready to choose the perfect format for any project—whether it fits in a pocket or makes a bold statement.
So go ahead—design with confidence. When the size is right, everything else just clicks.
Start your dropshipping business today
Card Sizes FAQs
What are the most common card sizes?
The most widely used card sizes are 2.5 x 3.5 inches for playing and trading cards, 3.5 x 2 inches for business cards, 3 x 5 or 5 x 7 inches for flashcards, and 5 x 7 inches (A7) for greeting cards. These sizes are industry standards, which means they’re compatible with most printing services, sleeves, and holders—making design, storage, and distribution way easier.
How do bleed and safe zones affect printing?
Bleed and safe zones protect your design during the cutting process. Bleed extends the background beyond the trim edge (usually by 0.125 inches), preventing white edges after trimming. Safe zones are margins inside the trim where vital content should stay (typically 0.2 inches). If you ignore these zones, your text or graphics could end up cut off, misaligned, or uneven—seriously wrecking an otherwise solid design.
Can I design custom-sized cards?
Yes! You can design custom card sizes, but be aware of the trade-offs. Nonstandard sizes may require special printing templates, custom envelopes, and could cost more to produce. They also may not fit into standard sleeves or wallets, which can be a dealbreaker for users. If you’re going custom, make sure it adds clear value to the experience—not just visual flair.
What card size is best for professional use?
For professional use, stick with 3.5 x 2 inches for business cards. It’s the universally accepted standard, ensuring your cards fit in wallets and card holders. For professional flashcards or training tools, go for 3 x 5 or 5 x 7 inches, depending on content complexity. These sizes offer enough space for clarity without becoming cumbersome. When in doubt, standard sizes always win for ease and professionalism.


Launch your dropshipping business now!
Start free trial.avif)


Related blogs

AI A/B Testing for Landing Pages
Learn A/B testing for landing pages with AI tools. Improve conversions, test faster, and optimize performance with smart data-driven experiments.


2026 Podcast Monetization Playbook: Best Podcasting Platforms that Make You Money
Find the best podcast platform for monetization in 2026. See which hosts offer the highest payouts and lowest fees for your show.


Top 10 Valentine Gifts for Girlfriend
Looking for the perfect Valentine gift for your girlfriend? Discover the top 10 romantic, thoughtful, and trending Valentine gifts she'll love.